Visiting Croatia or Island Hopping in the Adriatic and want to know where you should base yourself for your trip? Learn more about what there is to see in both towns to find out Where is better: Dubrovnik vs Split.
Dubrovnik
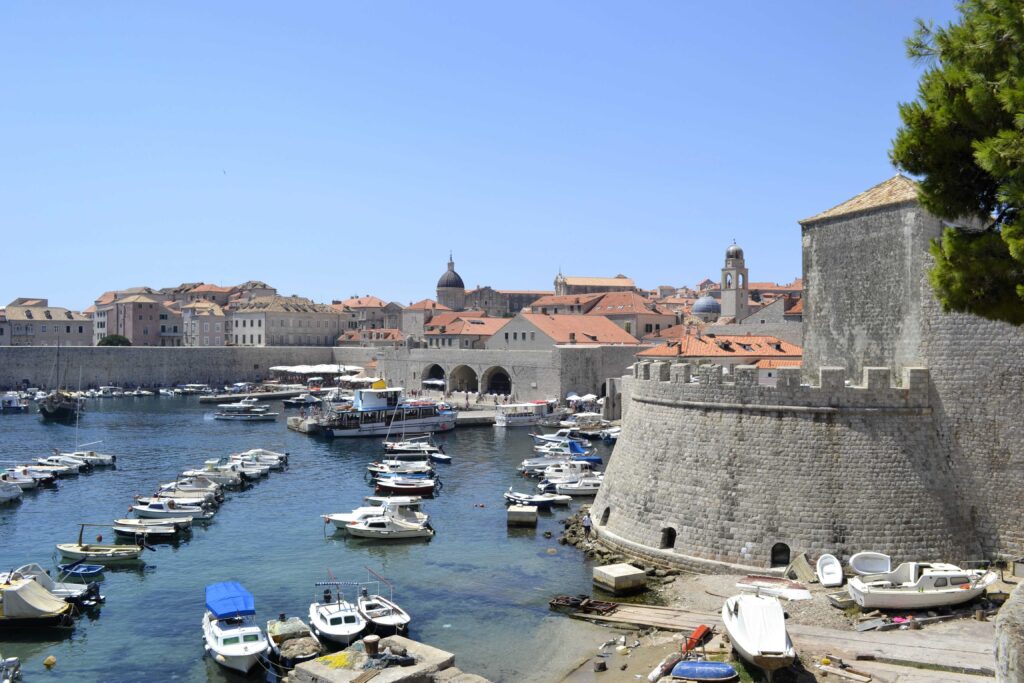
The fortified city walls of Dubrovnik
Dubrovnik is such a charm. The location, the walls, the views! The Old Town is beautifully preserved, despite a massive earthquake that hit the city in the 17th century and the most recent Siege of Dubrovnik back in 1991.
The buildings were all rebuilt post-earthquake in Baroque style and long walls and forts surround the whole city. Walk through the Pile Gate, through to the main promenade of the Stradun, and stroll along the City Walls. The city also gained even more popularity in recent years due to being a filming location for Game of Thrones! Check out THIS POST to see where are some of the filming locations.
Pile Gate Dubrovnik
Best time to visit & How long to stay
It does get busy during the summertime, especially when big cruise ships are docked in for the day. If you want to avoid the crowds, travel out of season before June or from late September. If you are there during summer, head out early in the morning or late at night once all the day trippers from the cruise ships have left.
Although the town of Dubrovnik in itself is not that big, it’s best enjoyed at a relaxed pace for 3 to 4 nights.
Clifftop Bar in Dubrovnik
You WILL love
The beautiful Old Town & city walls
Wondering around the cobbled streets and hidden alleyways
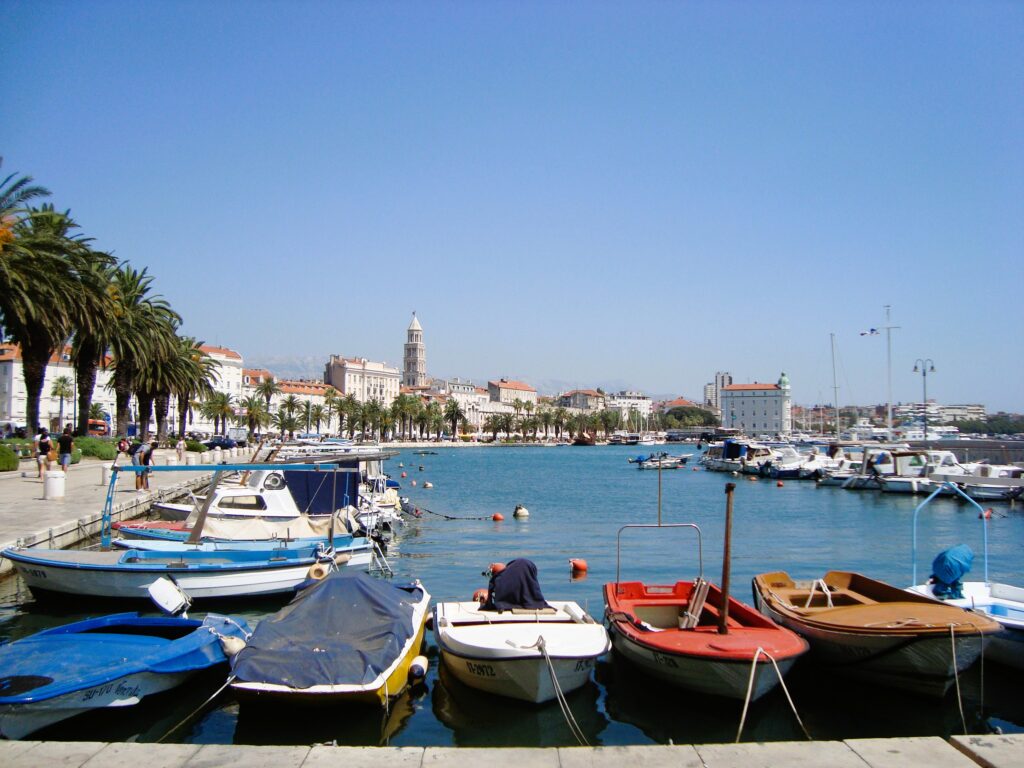
Split is a vibrant city, and compared to Dubrovnik you will notice that this is more of a place where the locals actually live and work. The city is much bigger than Dubrovnik, it’s in fact the second biggest city in Croatia. It has lots of accommodation, restaurants & bars which also makes it also much more affordable place to stay for budget conscious travellers.
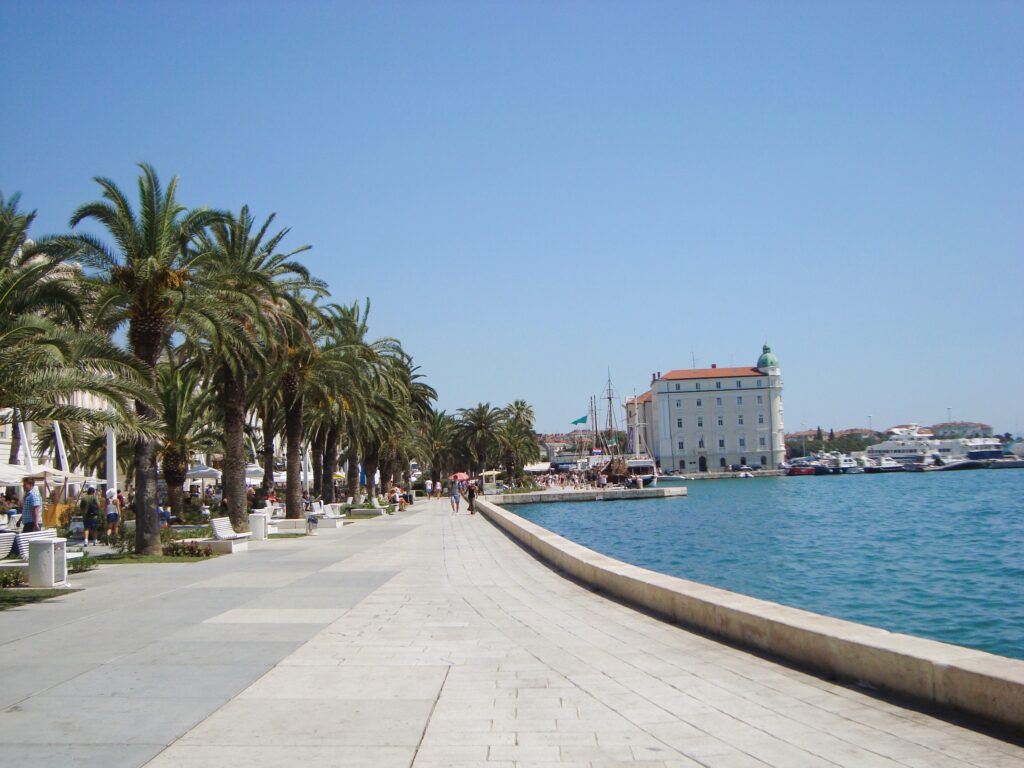
The Riva in Split
Although quite a big part of Split is now modern, one area still has the remains of one the best preserved Roman ruins, the Diocletian Palace. Take a stroll through the maze of laneways and stop at one of the many cafes or walk along the beautiful harbour, the Riva. Nearby Bacvice Beach is great for a swim too!
Best time to visit & How long to stay
Some cruise ships still dock in Split so it can get quite busy in peak summer season during June, July & August. Out of season during May and September the weather is still very pleasant and the accommodation affordable.
1 to 2 nights is sufficient to see the city and its main sights.
You WILL love
An inviting town centre within the Diocletian Palace & appealing harbourfront
More choice of accommodation, restaurants & nightlife in the city centre
More affordable than Dubrovnik
You might NOT love
Less historical attractions compared to Dubrovnik
The ‘Old Town’ part of the city is quite small
Split Old Town – Image by Michelle Raponi from Pixabay
Travelling via ferry to the islands
Apart from the islands of Krk, Brac & Losinj, none of the other Islands in Croatia have airports so you will need to take a ferry to get to them. Most of the popular ferry routes in Croatia are run by large car ferries or catamarans. Jadrolinija ferries serve routes to the islands from Dubrovnik & Split, as well as from Italy to Split (from Ancona, 11 hours), and Dubrovnik (from Bari, 7 hours). Local company Krilo also runs services from Split to some of the Croatian islands like Hvar, Korčula & Brac.
Want to read more about some of the Best Islands in Croatia? Check out my other post HERE!
Travelling by Ferry to the islands
To Sum it up: Where is better, compare Dubrovnik vs Split
Most people will usually base themselves in either Dubrovnik or Split on their trip to Croatia. If you have the time to do both cities, I say do both, they are different from each other and that may also make ferry connections to the islands easier so that you are not backtracking. If you can’t do both, I say go for Dubrovnik! The gorgeous Old Town won me over!
One of the many squares in Dubrovnik
Book
Hope you enjoyed this article on Where is Better: Dubrovnik vs Split. Want to read more? Check out more of my posts below:
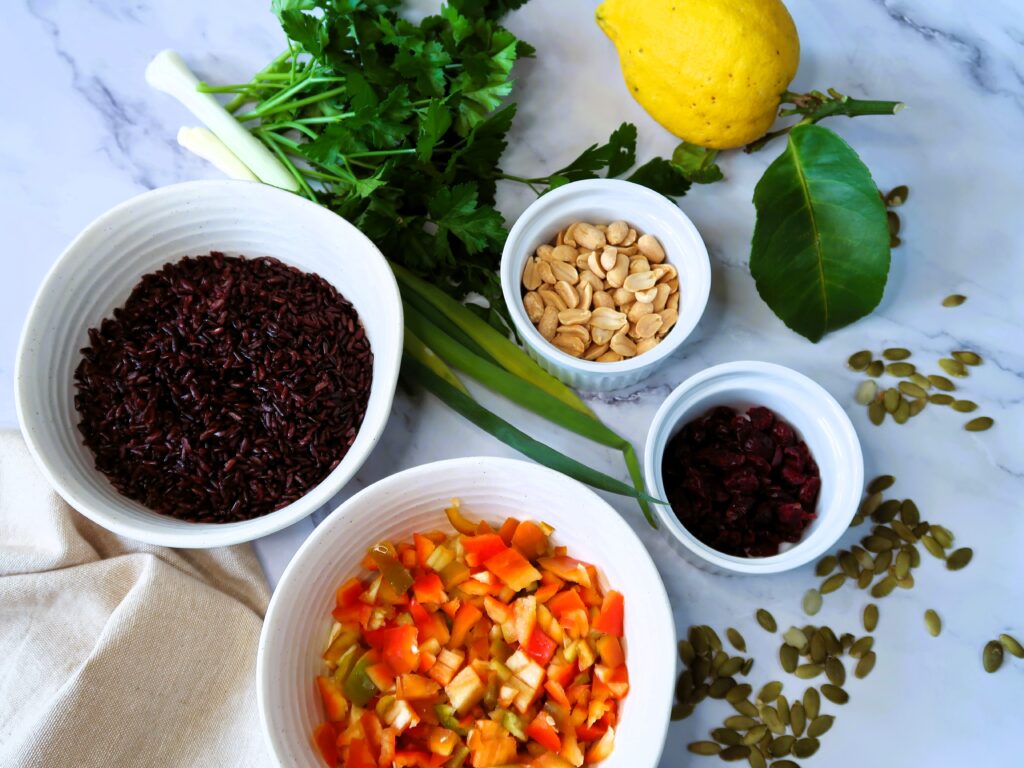
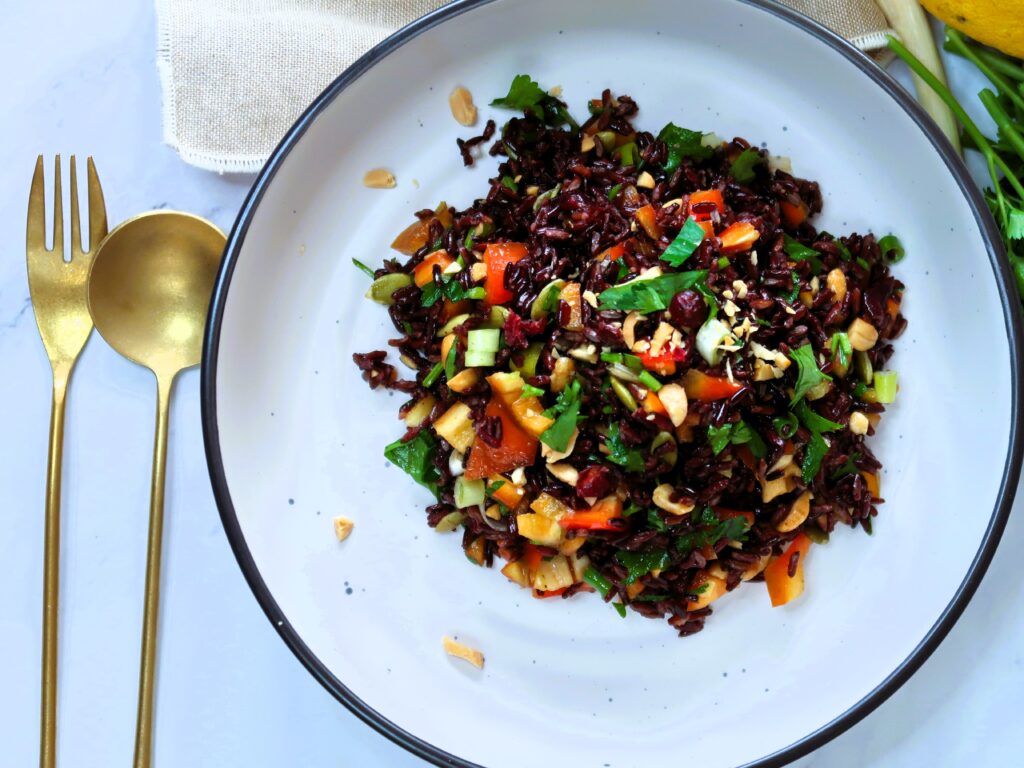
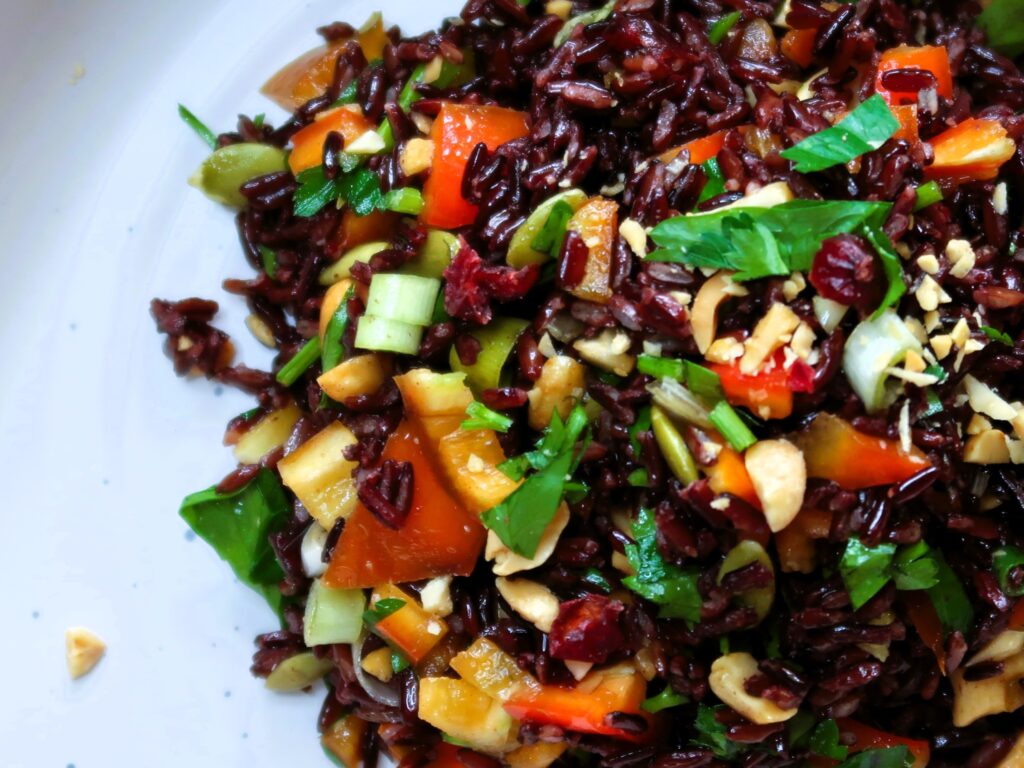
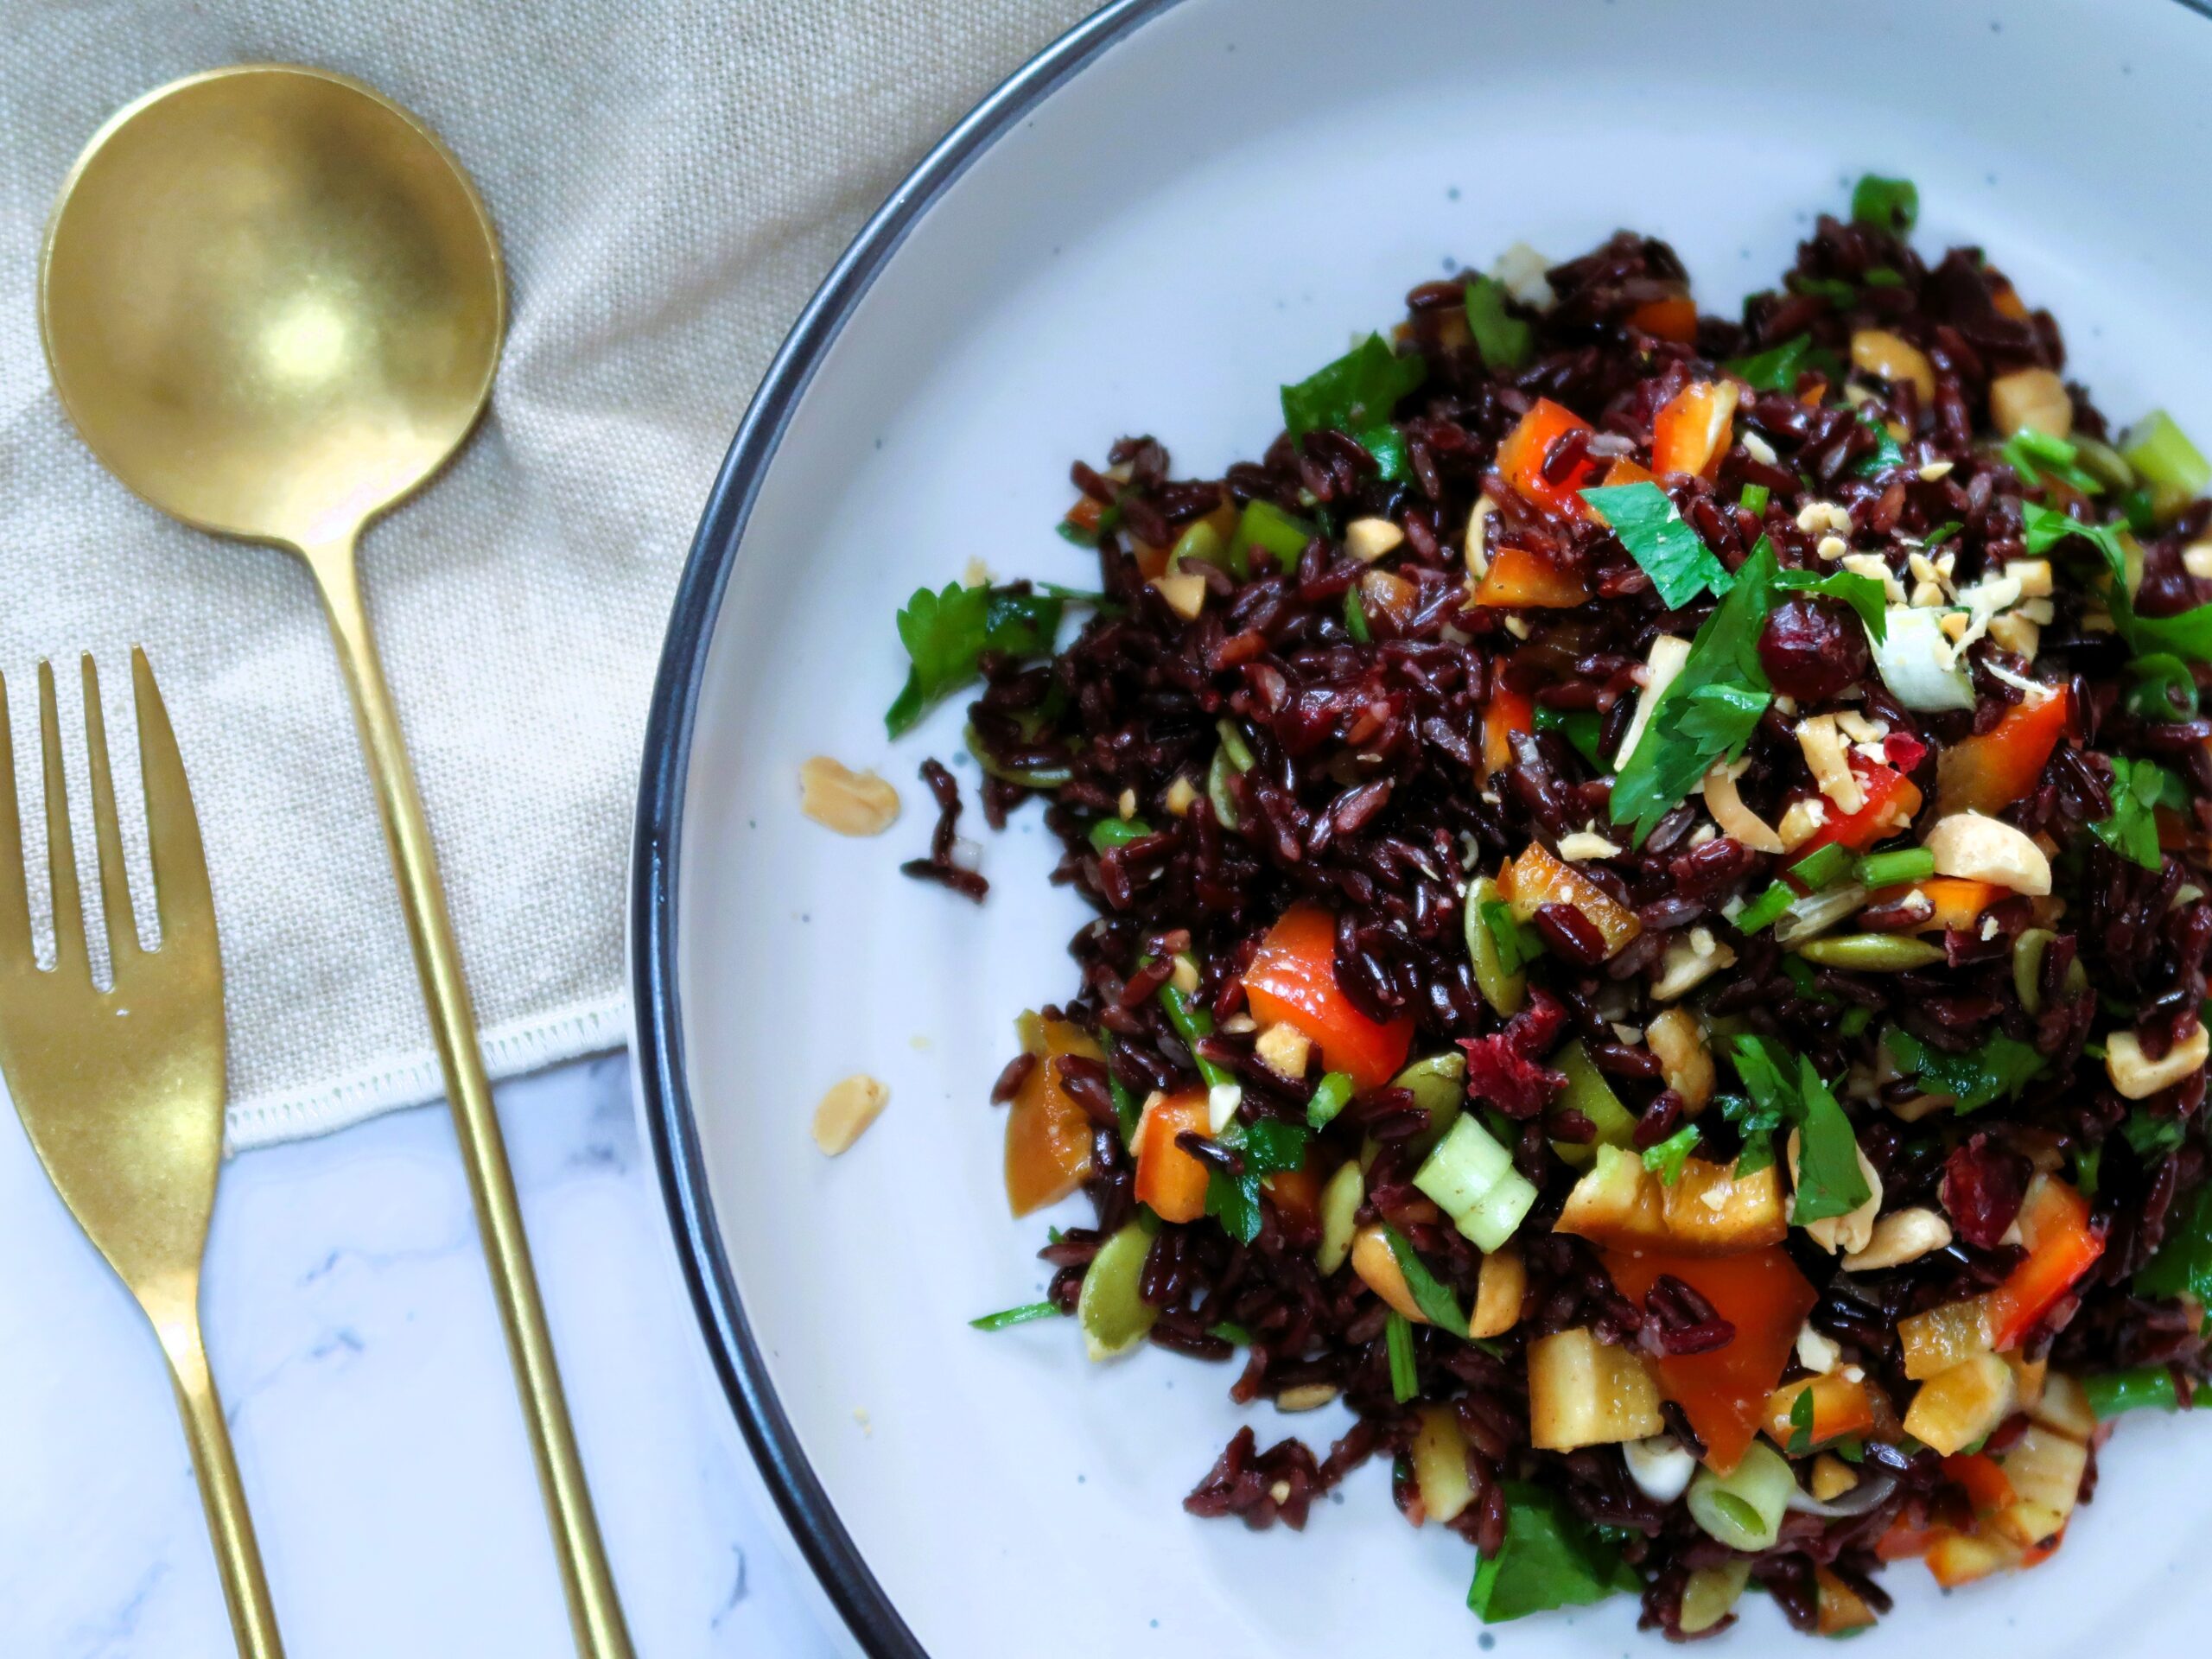
Chewy, delicious, and filled with a heap of crunchy & sweet tasty bits. This Black Rice Salad is another favourite at family dinners and parties. Not only it’s great to accompany roast meats, a BBQ or pan-fried salmon, but it’s also perfect for a light lunch on its own.
Ingredients for this Black Rice Salad
Black Rice
Dark in colour with purple hues, not only it looks beautiful on the plate – Black rice is also very good for you. It’s a lot less processed than white rice and is high in fibre and antioxidants, thanks to its black colour. Flavour wise it’s very nutty, similar to brown rice, and has a much chewier texture than white rice. It holds its shape very well, if cooked right, and is perfect for cold salads.
More tips in the next section after the ingredients on How to Cook Black Rice!
You can find Black Rice in your local supermarket or Asian Grocer. A lot of versions of rice salads you can find online are with brown rice and that is also equally as delicious and healthy. If you can’t get a hold of Black Rice, Brown Rice is the perfect substitute!
Red Capsicum
Perfect to add some freshness and crunch to the salad, any type of capsicum or peppers are great. I like sweeter ones so I often use sweet Italian long peppers
Spring Onion & Parsley
You can also use red onion if you prefer instead of the spring onion!
Nuts and Seeds
Cranberries – add a lovely tang and sweetness to the salad. Can also be substituted for raisins or sultanas
Peanuts – for crunch and can be replaced for chopped cashews, hazelnuts or slivered almonds, or omitted completely
Pepita Seeds – can be substituted for sunflower seeds
Dressing
Sesame Oil – or you can substitute for vegetable or peanut oil if you prefer a less flavoured oil
Soy Sauce – or tamari for a healthier option that has less sodium. I do not recommend substituting for dark soy as it’s quite strong in flavour and should be used in much smaller quantities
Lemon Juice – or lime juice
How to make this Black Rice Salad
Cooking the Black Rice
Follow packet instructions and make sure to not overcook the rice as it will go very mushy otherwise. I like to usually cook Black Rice the same as when I cook Brown Rice on the stove. After thoroughly rinsing the rice under cold water, I just boil it in a big pot of water for around 30-35 minutes then strain it. There is a great post online HERE on How to Cook Black Rice.
Chop ingredients
Dice the capsicum in small 1 cm pieces. Roughly chop the cranberries & peanuts. Thinly slice the spring onion and chop the parsley.
Make Dressing & Assemble
To make the Black Rice Salad dressing, combine the lemon juice with the sesame oil & Soy sauce. After the back rice has cooled down, combine with all the ingredients and the dressing.
Serving Suggestions & Storage
This salad recipe is for 2 to 3 main-size portions (3 cups of cooked rice). As a side, it will serve up to 4 people. It’s great served as a side dish with roast meats and seafood dishes like salmon and prawns.
Store any leftover salad in an airtight container in the fridge for up to 2 days. The salad will keep for longer is not dressed with the dressing, for up to 4 days. If the rice becomes dry in the fridge, re-heat gently in the microwave for 30 seconds.
3cupsCooked Black Rice ((roughly 1 cup uncooked black rice))
1largeRed Capsicum(diced in 1 cm pieces)
4tbspPeanuts(roughly chopped)
2tbspDried Cranberries(roughly chopped)
2tbspPepita Seeds
4Spring Onions(thinly sliced)
1small bunchParsley(chopped)
6tbspSesame Oil
4tbspLemon Juice
4tbspSoy Sauce
Instructions
Cook the Black Rice as per packet directions, strain and set aside to cool. See notes below for cooking of the rice.
While the Black Rice is cooking chop the capsicum, peanuts, cranberries, parsley and spring onion
Combine the Sesame Oil, Lemon Juice & Soy Sauce for the dressing
Mix all the ingredients together and serve!
Notes
To cook black rice: Follow packet instructions and make sure to not overcook as it will go very mushy otherwise. I like to usually cook Black Rice the same as when I cook Brown Rice on the stove. After thoroughly rinsing the rice under cold water, I just boil it in a big pot of water for around 30-35 minutes then strain it. Check texture after 30 minutes.This salad recipe is for 2 to 3 main size portions (3 cups of cooked rice). As a side it will serve up to 4 people. For larger crowds (6-8 people) double the ingredients.Storage: Store any leftover salad in an airtight container in the fridge for up to 2 days. The salad will keep for longer is not dressed with the dressing, for up to 4 days. If the rice becomes dry in the fridge, re-heat gently in the microwave for 30 seconds.Substitutes for most ingredients can be found in the post above recipe card.
Course: Salad
Keyword: black rice, black rice salad, light lunch, rice, side dish
Planning your next Europe getaway and want to venture somewhere off the beaten track on your trip? Be amazed by the beauty of these Top 5 Destinations and the Best of Europe’s Hidden Gems.Read more below on what makes these places unique, what to eat and how to get there.
Ghent – Belgium
Europe, where do I begin with all the amazing places to visit? There are so many incredible countries soaked in hundreds of years of history, beautiful big and small cities with a maze of narrow cobbled laneways, majestic cathedrals and so much more.
When I first planned to move to Europe I had all this long list of places I wanted to see and it was all the bucket-list destinations we have all heard of.
Lake Garda, Italy
But, those times I ventured off that list and went to some other places I had not heard of before, what I found was nothing short of magic!
So, if you have the time, don’t be afraid to venture off the itinerary you had in mind. There are more amazing destinations than just the 5 in the list below, the list could be endless! These are my favourite Top 5 of Europe’s Best Hidden Gems.
Mgarr Harbour, Gozo
Europe’s Best Hidden Gems – Top 5
Ghent, Belgium
You probably have heard of Brussels and of the gorgeous little town of Bruges, but have you heard of Ghent? A stunning city with lots and lots of medieval charm. A popular university town, it has great restaurants, bars and some cool, modern street art too!
Take a stroll or a boat ride on river Lys and marvel at the beautiful façades of the Graslei. Visit St Bavo’s Cathedral to see the stunning masterpiece of the Ghent Alterpiece. And, if you are into some real life historic horror stories, visit the Gravensteen Castle, also called the Castle of the Counts to learn more about it’s dark past.
Gravensteen Castle, right in the centre of Ghent
Getting to Ghent
International & domestic airlines fly into Brussels (BRU) and then it’s just under 1 hour by direct train or by driving to Ghent if you have a car. If you are in France or England, you can also reach Brussels with the Eurostar in less than 2 hours!
Weekenders in relaxing at the Graslei in Ghent
How long to stay
2-3 days
What to eat
Waffles, Chocolate, Chips (Frites) & Beer of course! Do I need to say more or are you packing your bags already? Read more about Belgium’s most popular foods & beers HERE in my other post.
One of the many chocolate stores in Belgium
Wroclaw, Poland
With a stunning, colourful town square to rival it’s other bigger sister city, Krakow, Wroclaw is still an undiscovered beautiful university city to visit in Poland. Tiny little gnome statues appear in every corner of the city, representing the long history of communism in the past of this country and the protest against it.
It also has one of the most beautiful Christmas markets in Europe! This one definitely makes the list in being one of Europe’s Best Hidden Gems.
You can read more about Wroclaw in my other post HERE.
Colourful buildings in Wroclaw Market Square
Getting to Wroclaw
Wroclaw has an international airport located just outside town (Wroclaw Nicolaus Copernicus Airport, WRO). It serves flights from London (2 hours), Warsaw & Frankfurt (1 hour) and from many other countries in Europe. You can also get there by train from Berlin, which has a daily connection and takes around 4 hours. It’s about 3 hours by train from Krakow.
How long to stay
2 -3 days
What to eat
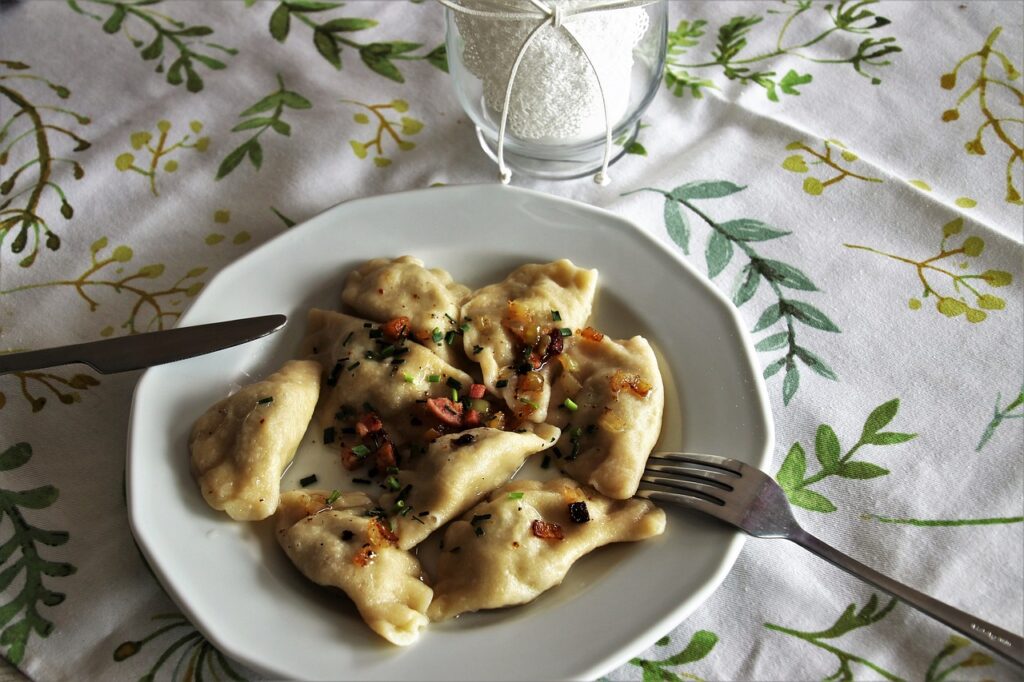
Pierogi filled with potato or cheese (or both), a warming Hunters Stew or Bigos, made with pork and sauerkraut, Cabbage Rolls or Golabki, stuffed with meat in a red sauce.
Pierogi topped with butter, onion and pork rinds – Image by Julita from Pixabay
Gozo, Malta
This little island located right next to it’s big sister Malta, is small but mighty in history and things to see. Venture to the capital Victoria, to see the fortified walls of the Cittadella for a great view over Gozo or cool off on the stunning beaches with red sand of Ramla Bay or San Blas.
Inland Sea at Dwejra, Gozo
It also has temples dating back to before the pyramids, the Ggantija Temples! It comes alive during the summertime for the many ‘feasts’, where each small town celebrates its patron saints and puts on fabulous parades and fireworks. Take a day trip to nearby Comino to see the stunning Blue Lagoon.
The Blue Lagoon on the Island of Comino, right next to Gozo
Getting to Gozo
There is no airport in Gozo, so you need to fly into Malta’s main airport (Malta International Aiport, MLA). From Malta, you need to get to Ċirkewwa Harbour, where the ferry will take you across to Gozo. The Ferry crossing is about 25 minutes. Although there is public transport available, the services are not frequent so hiring a car would be your best option to get around on the island!
View over Ramla Beach in Gozo from Tal-Mixta Cave
How long to stay
4 – 5 days
What to eat
Ftira or Gozitan Pizza, is the speciality here and you will find it either filled with ricotta & goat cheeses, or topped with potatoes, slices of tomatoes and loads of olives and capers (they grow wild all over the island). You will also find rabbit stew, called Stuffat Tal Fenek, and of course Pastizzi, two very traditional Maltese foods to eat. The traditional Pastizzi fillings are Ricotta or Peas.
Rabbit Stew, with a Cisk beer to it wash all down of course
Lake Garda, Italy
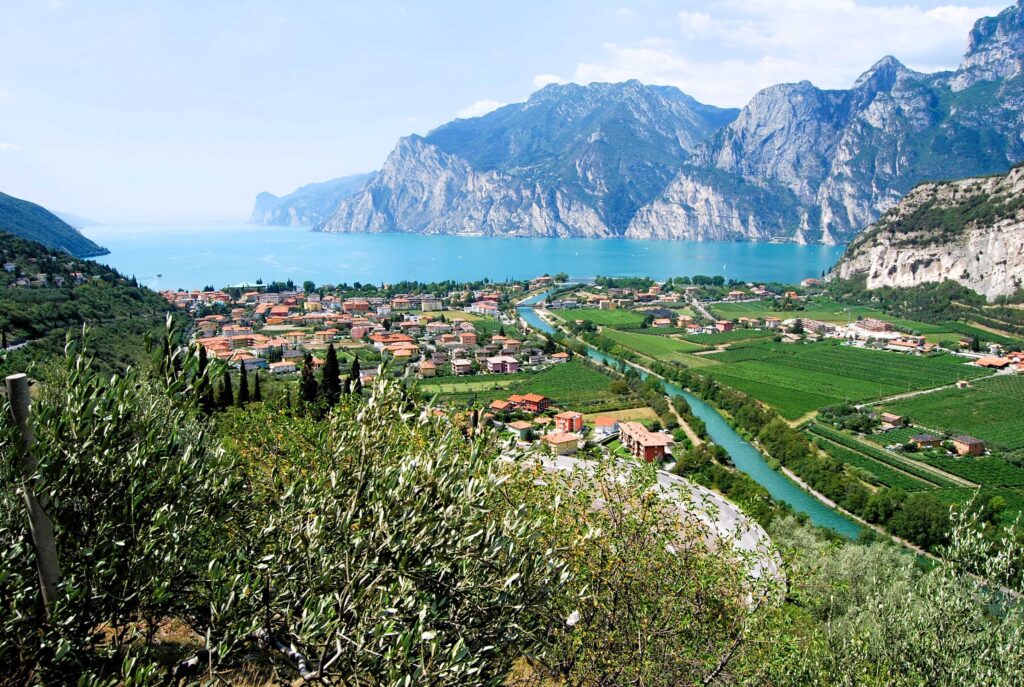
When people think of a lake in Italy, everyone thinks of Lake Como, but did you know that Lake Garda is the biggest lake in Italy? With a picturesque, green coastline, it’s dotted with pretty little towns and that makes Lake Garda one of Europe’s Best Hidden Gems! The most popular towns are Sirmione, Malcesine, Riva del Garda and Limone.
A scenic view of Riva del Garda
Sirmione, has a 14th century roman castle that is one of the best preserved in the whole of Italy! For some fabulous views on a clear day, head to Malcesine and ride the cable car to the top of Monte Baldo.
You can also see the remains of a roman villa at Grotte di Catullo dating back to the 1st Century BC. The locals LOVE Lake Garda and it’s a very popular day trip so it does get busy on weekends, public holidays and during summertime.
Scaliger Castle, Sirmione
Getting to Lake Garda
The closest airport is Verona (Valerio Catullo Airport VRN) in the north of Italy which is just outside the city of Verona (famous for Romeo & Juliet and Juliet’s Balcony). From Verona, by car you can reach Lake Garda in about 20 minutes. You can also reach the towns of Peschiera e Desenzano on Lake Garda via train from Verona station. Venice international airport is around 2 hours away by car to Lake Garda.
Lake Garda in bloom during spring
How long to stay
2 – 3 days
What to eat
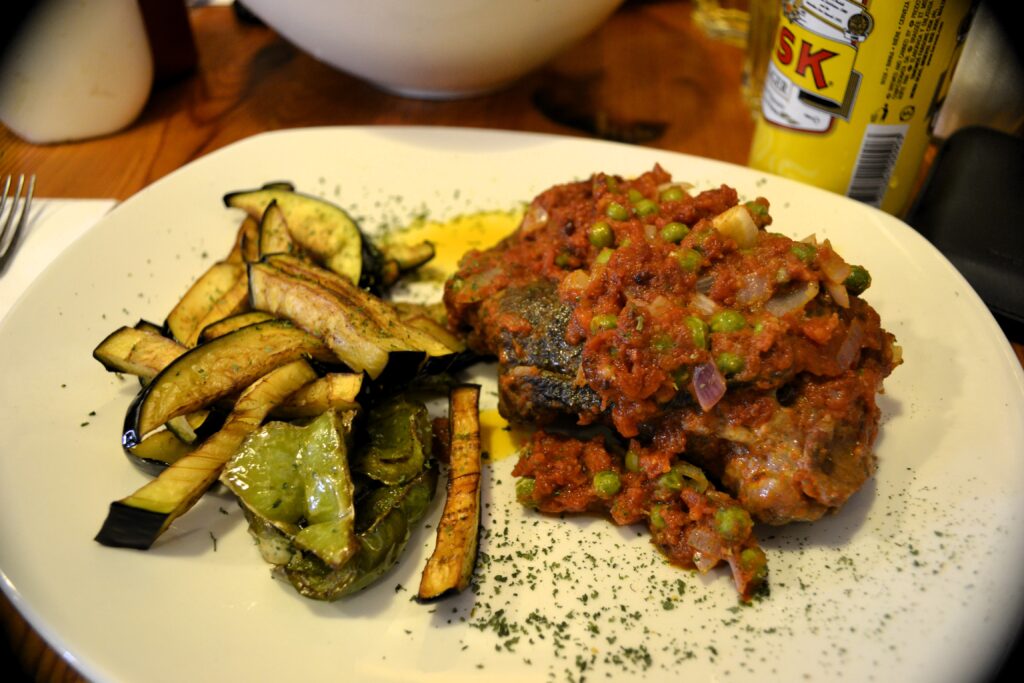
The main speciality of the area is seafood dishes! Locals will travel for the day just to have a seafood feast for lunch from Lake Garda. A very typical pasta dish is Bigoli con le Sarde, which is a thick spaghetti with fresh sardines and lots of garlic & parsley (You can find my version of Bucatini with Sardines HERE).
Risotti are also very typical of the north of Italy and the Vialone Nano variety is often used to make a creamy red wine risotto called Risotto All’Amarone, a local wine of the area.
Lucerne, Switzerland
Chapel Bridge, Lucerne
Another stunning medieval town, with distinctive wooden bridges that stand the test of time, being built in the 1400s. The old town is charming with beautiful painted houses and stunning churches with Renaissance and Baroque architecture. Take a trip to Mt Pilatus on a clear day for stunning views over the city, Lake Lucerne and the surrounding Alps. You can usually see snow capped mountains from November to April.
Getting to Lucerne
The closest airports to Lucerne are Zurich (ZHR) or Bern (BRN), from there Lucerne is well connected by rail links and road that will get your there in about 1 hour. Geneva is around 3 hours away by car / train.
The beautiful façade of Restaurant Fritschi in Lucerne, opened in 1602
How long to stay
2 – 3 days
What to eat
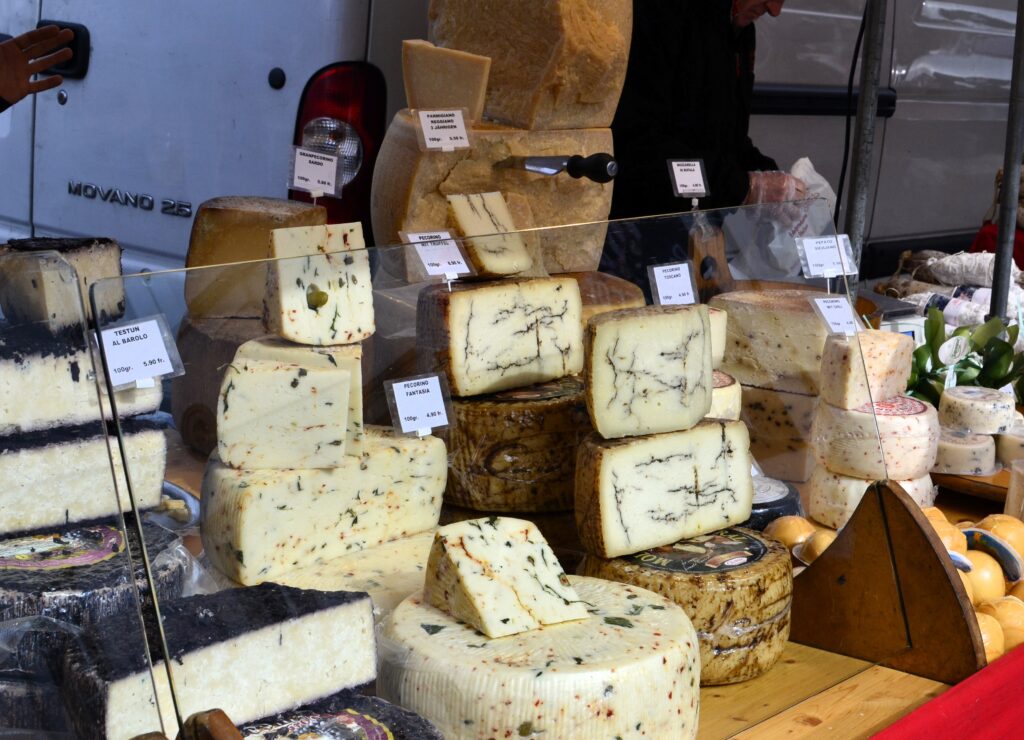
Potatoes and cheese, lots and lots of swiss cheese! Swiss Potato Rösti is a very popular dish and is essentially a very large hash brown. The potatoes are shredded either when raw or par-boiled then fried in butter or oil till crispy. They are just eaten like that or topped with eggs, cheese, mushrooms (usually chanterelles) or bacon and onions.
Swiss Fondue is the other popular dish and comes served in a fondue pot served at the table, where you dip chunks of bread or potatoes in. The cheeses used for a fondue are usually a mix of Gruyere and other Swiss Cheeses like Emmental or Vacherin.
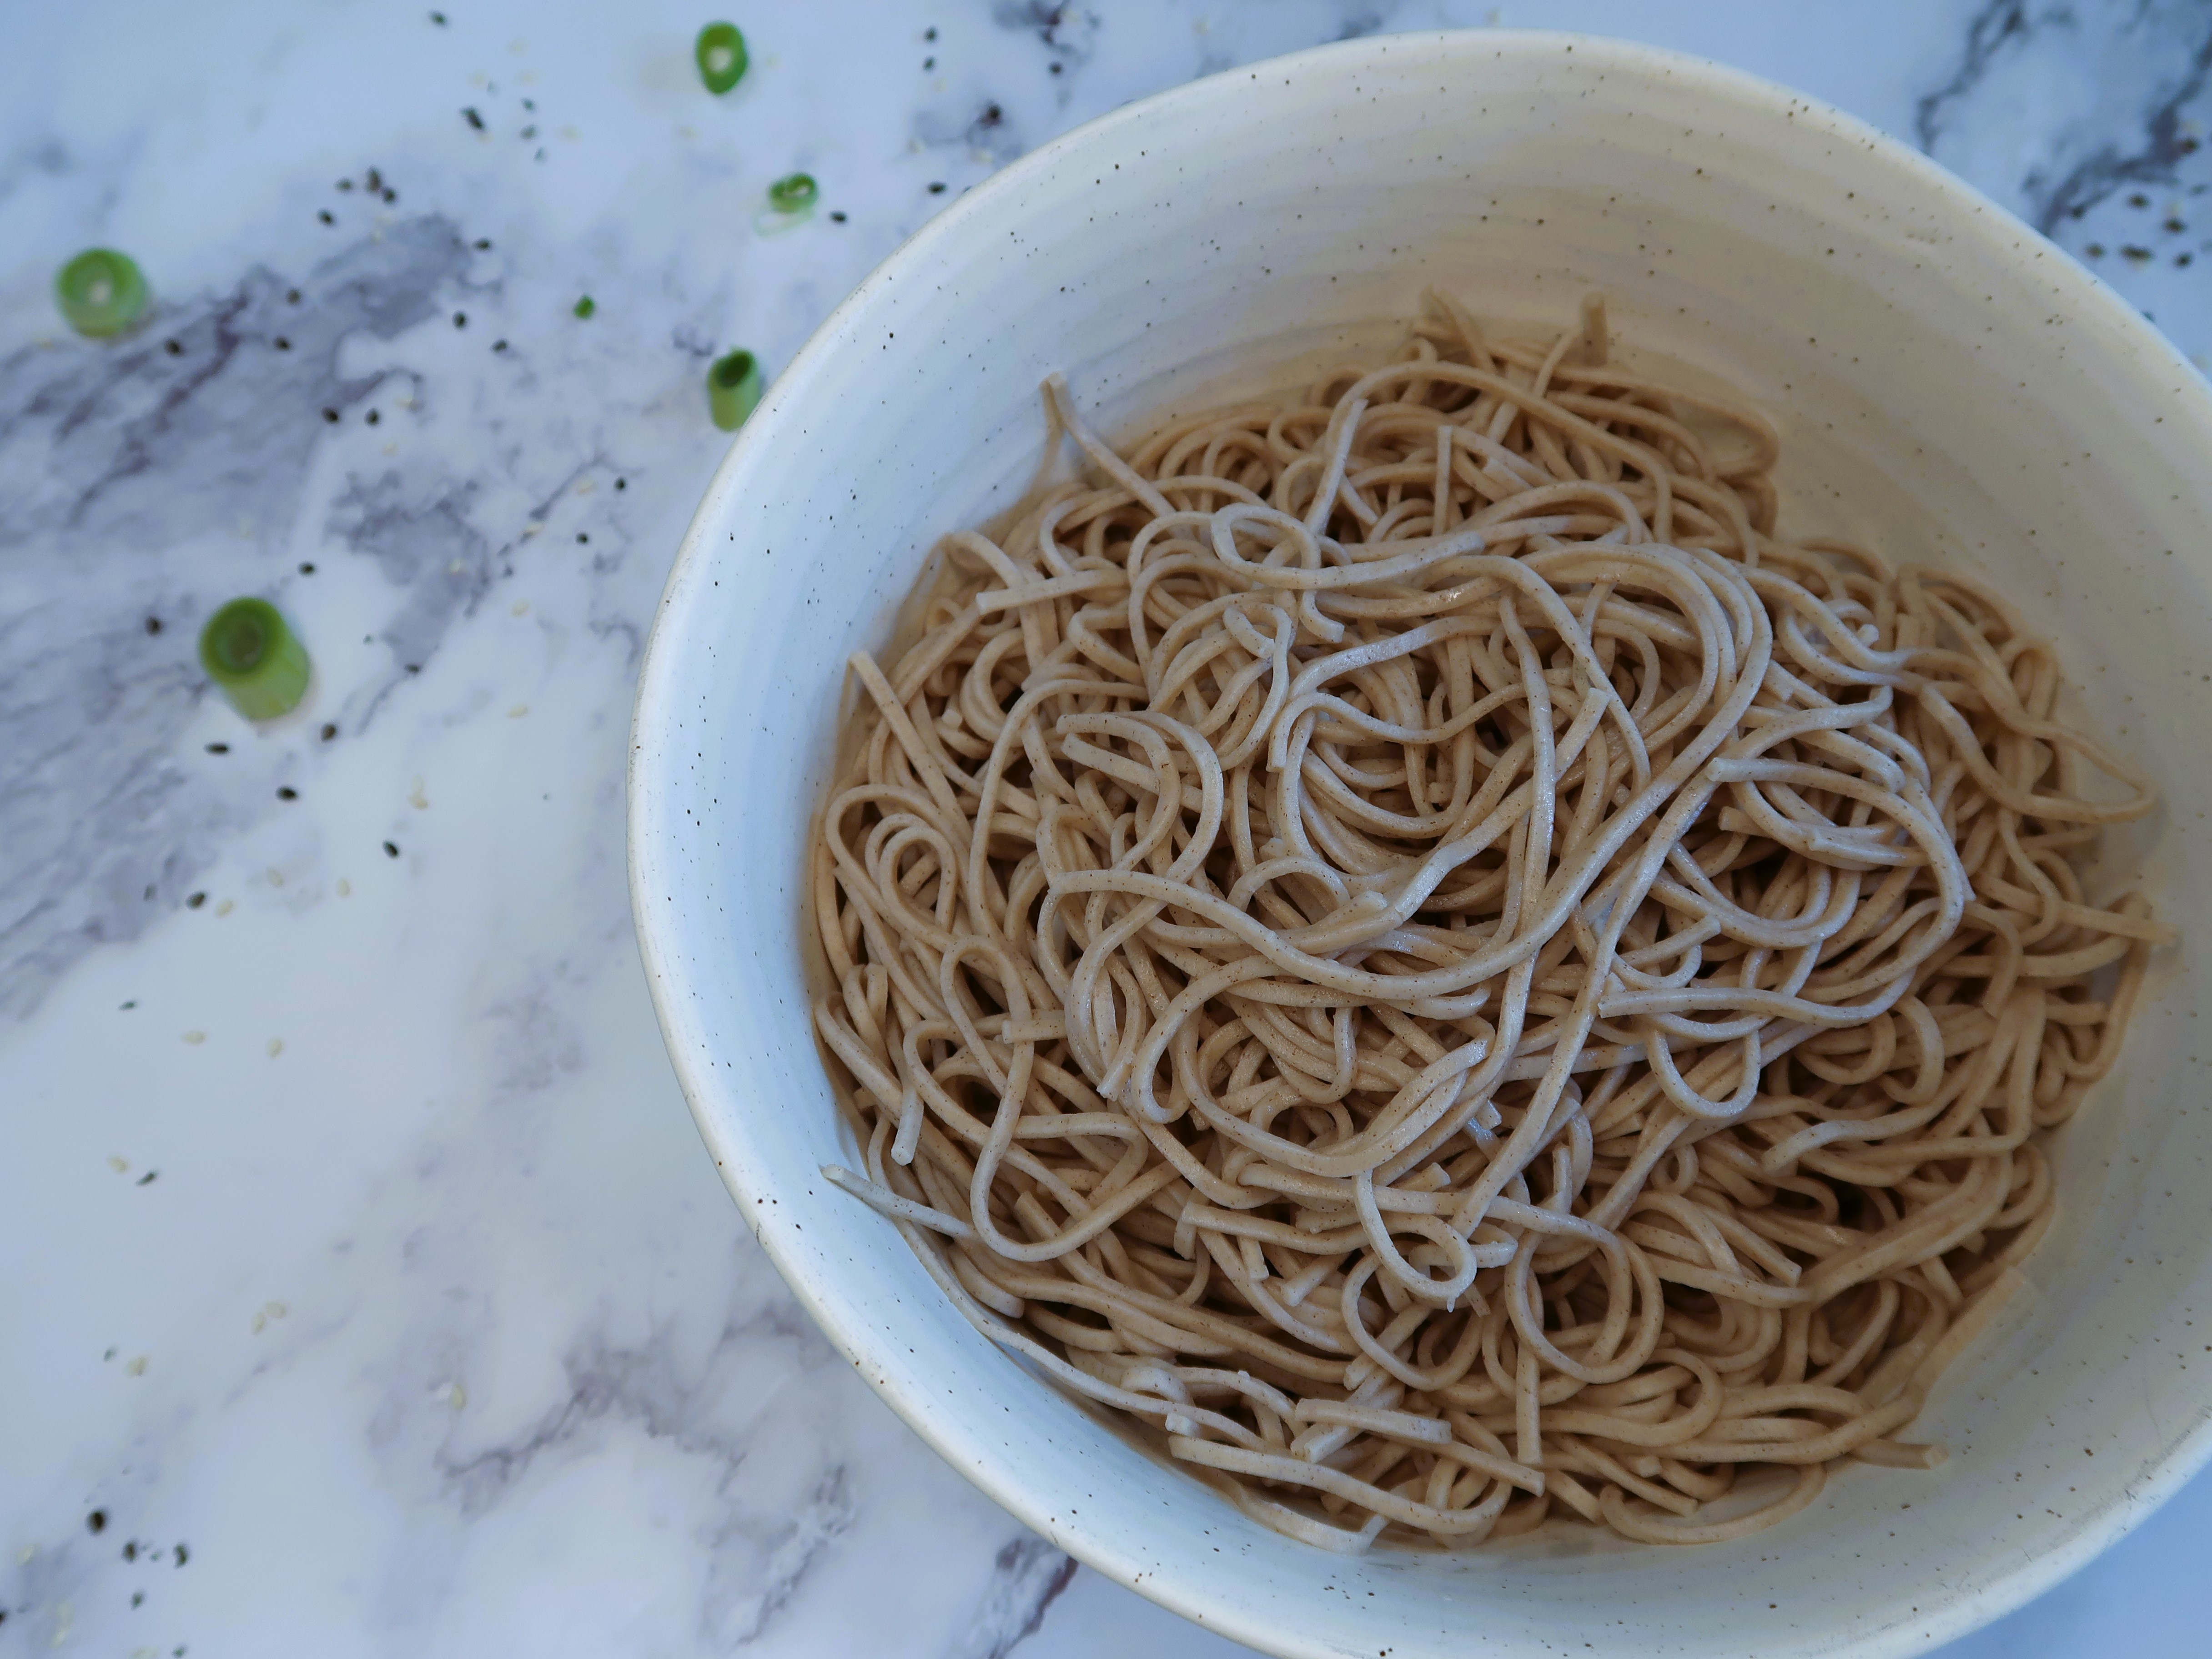
I cook Soba Noodles so often at my house and it’s one of my go-to dishes everyone loves! It took me quite a few tries and some fine tuning to cook them right so that they don’t stick and have good bounce. So, here are 3 Top Tips on How to Cook Perfect Soda Noodles and my Step by Step instructions.
Tips on How to Cook Perfect Soba Noodles
Boil over stove
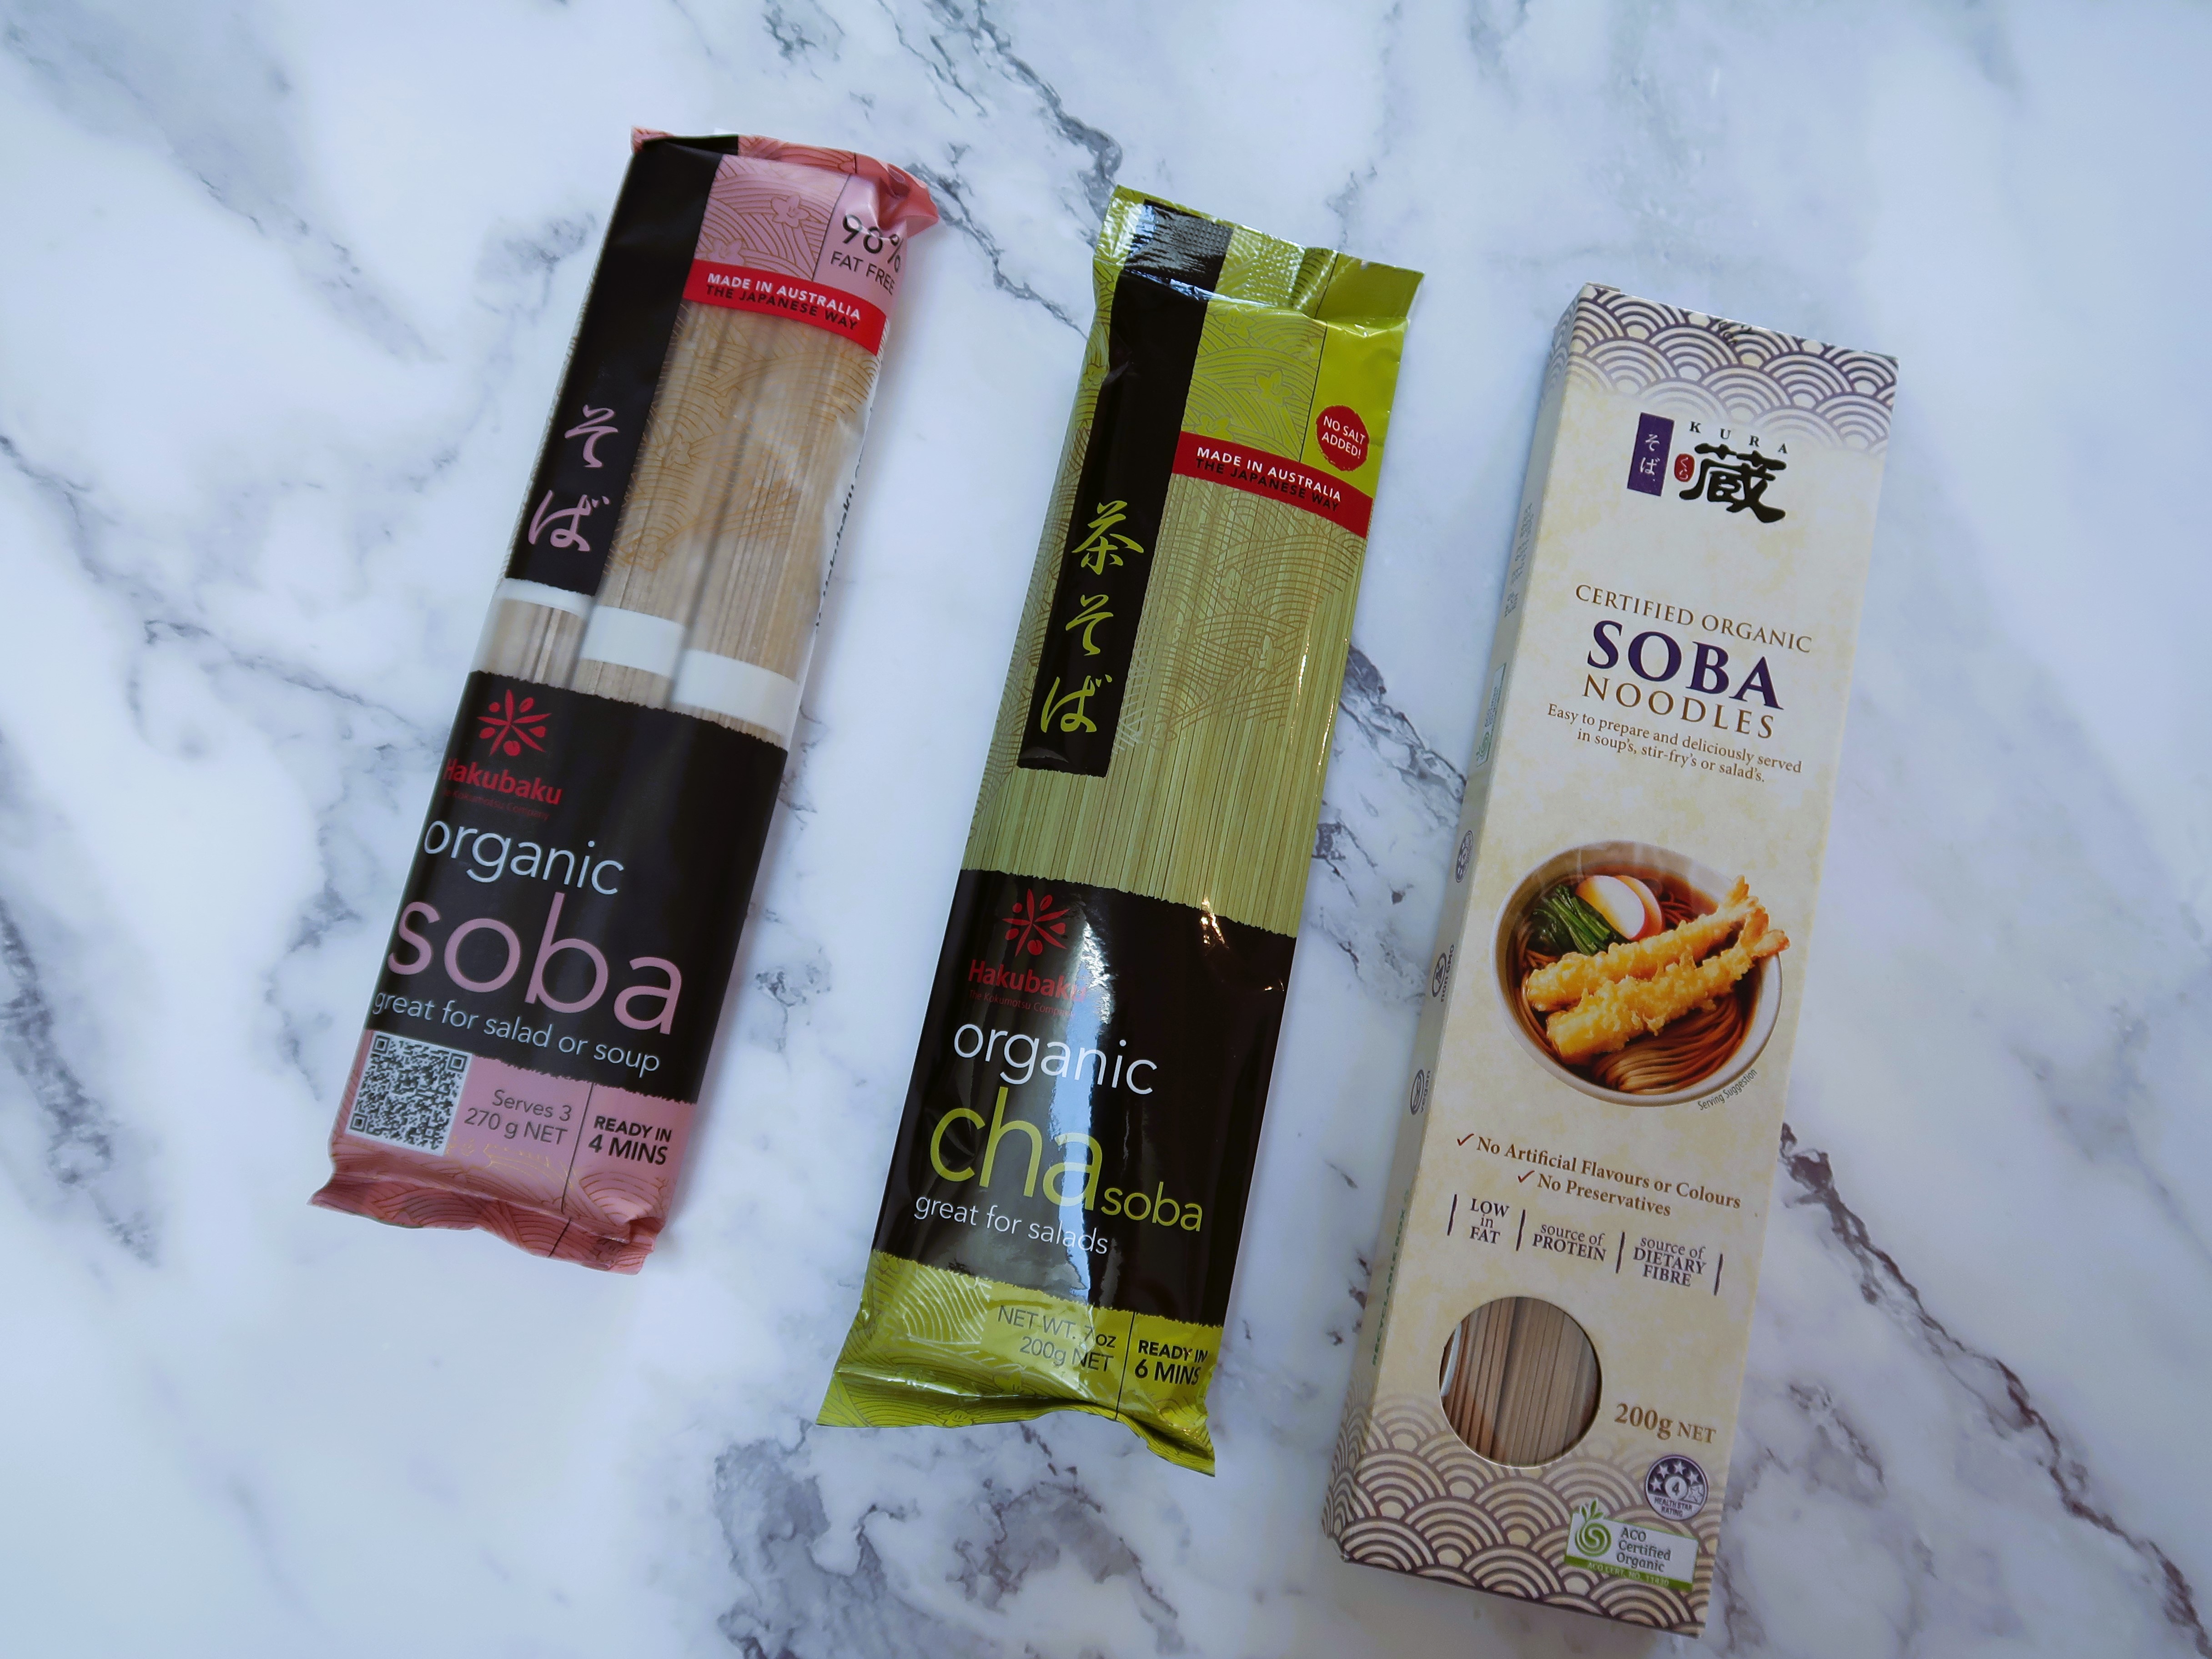
Walk through the noodle section at your supermarket and you will see many packets of noodles that are pre-cooked. If you pick up these you would know that all they need is a quick minute in a bowl of hot/warm water to come to life again. But, dried Soba noodles, a bit like some of the other dry noodles you can find, need to be cooked over a stove in a pot of boiling water for a few minutes. DON’T put them in a bowl and just cover them with hot water as it will make them break down and go to mush!
I have been usingHakubaku Soba Noodlesfor years and I love them! You can find them in your local supermarkets, specialty stores and also on Amazon. There are also many other varieties, like some that are Cha Soba(flavoured with some green tea powder and have a slight green tinge) and brands that may have more or less buckwheat flour in them.
Put a timer on for the cooking time
Might sound like an obvious one, but, honestly how many times have you put a pot on the stove and then walked off and gone to do other things and you forgot how long you had something bubbling away?
These noodles are not the kind that you can just forget on the stove. I find that normal wheat pasta will allow those extra few minutes, but Soba noodles won’t. The buckwheat flour that is in them is actually gluten free, so it has less elasticity than gluten. Any extra cooking time will make the noodles get way too soft and break when you stir or drain them! Every brand will have different cooking times – so follow the instructions exactly as per the packet. Put a timer on and when it goes off, drain them immediately.
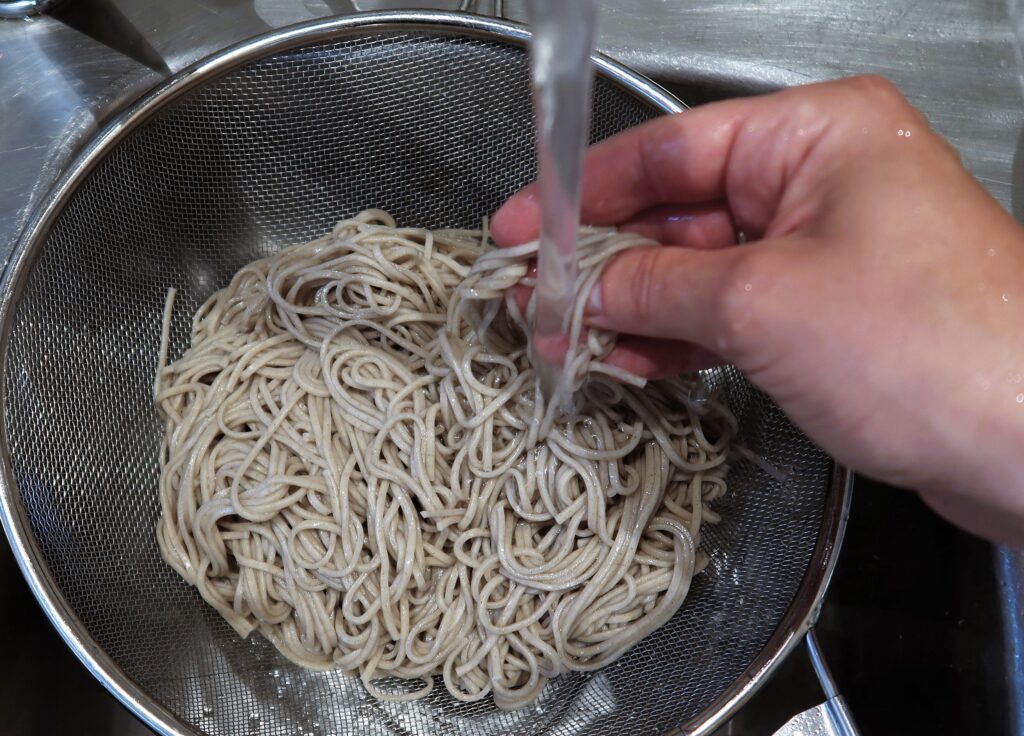
Rinse them
Super important step after draining them to make sure you have perfect soba noodles: Run them under cold water immediately! Keep them there and make sure they are completely cold the whole way through. That will stop the cooking process and ensure that the noodles don’t stick together.
My Step by Step Recipe below will ensure you know how to cook perfect Soba Noodles every time!
How to eat Soba Noodles
You can serve them cold, with some sliced spring onion and sesame seeds. To make a simple dipping sauce (for 2 people) mix a cup of Dashi or Chicken Stock, 4 tablespoons of soy sauce and 4 teaspoons of mirin. With your chopsticks grab some noodles and dip them in as you eat them. Don’t worry about the slurping.. the lounder the better! This is how they are eaten in Japan.
And if you want to try a wonderful cold salad with these bouncy soba noodles, give a try to my Healthy Soba Noodle Salad Recipe on the blog. Enjoy!
Bring 2.5 litres of water to the boil in a large saucepan
Add the dry soba noodles and cook them exactly as per packet instructions (3 to 5 minutes)- put a timer on!
Once the timer is up, drain them over the sink and run cold water on them
Run your hands through all the noodles and run the water until they are cold the whole way though to stop the cooking
Place them in a bowl and serve or add a tablespoon of peanut or sesame oil to stop them from sticking together if you are serving them later.
Notes
Serving Suggestions: You can serve them cold, with some sliced spring onion and sesame seeds. To make a simple dipping sauce (serves 2) mix a cup of Dashi or Chicken Stock, 4 tablespoons of soy sauce and 4 teaspoons of mirin and dip the noodles in as you eat them.Storage: if you are not eating immediately, the noodles can be stored in an airtight container in the fridge for up to 4 days.You can add a few tablespoons of vegetable or sesame oil to stop them from sticking together.If after being in the fridge they have dried out, you can reheat them briefly in the microwave for 30 seconds
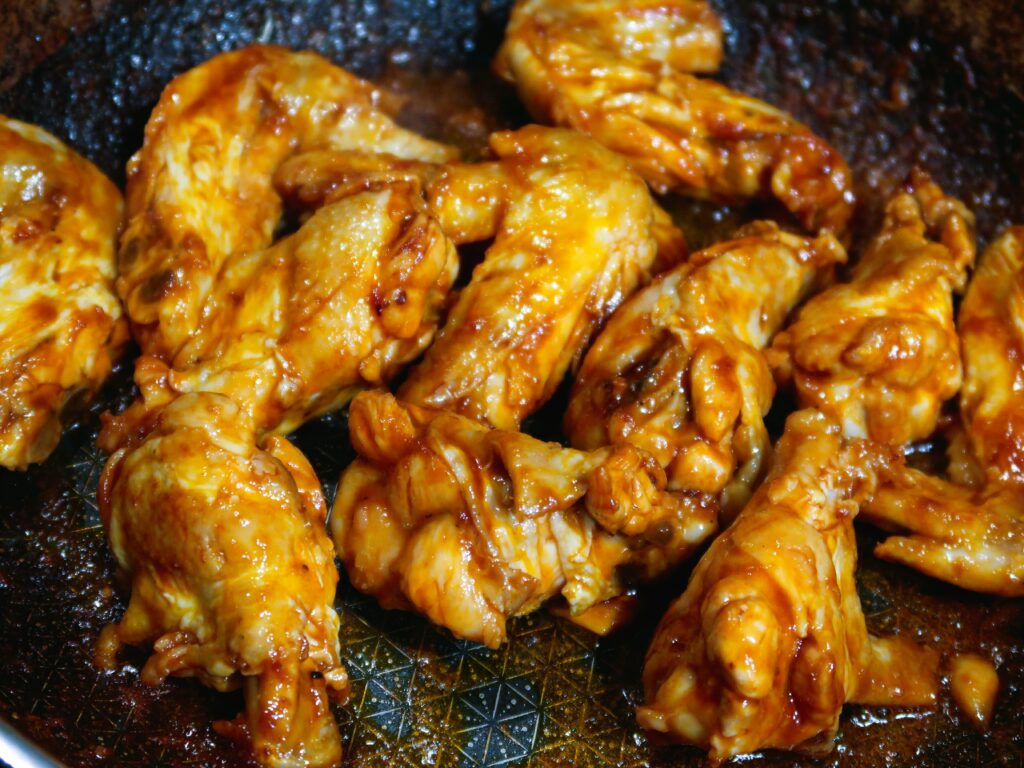
You won’t believe how tender and juicy these wings are! The secret? Cooking them twice! Inspired by Neil Perry BBQ Chicken Wing Recipe, the marinade is a flavour explosionthat combines some salty & sweet staple Chinese ingredients with some subtle heat from the chilli sauce. These Twice-Cooked Sticky Chicken Wings will be a crowd pleaser and will have you going back for more!
Ingredients for these Twice-Cooked Sticky Chicken Wings
Chicken Wings
I usually purchase these as whole wings. I will usually par-boil them whole, then once they have slightly cooled, I cut them in half (separating the drumette and wingette) and cutting off the wing tip. Evolving Tablehas a great post with a step by step guide on how to cut them! I personally find that they are much easier to cut once cooked. If you prefer you can also trim off any excess skin at this point too. I love using Chicken Wings for making homemade chicken stock too as you can get loads of flavour from them in a short amount of time! More on that below.
Image by Eko Anug from Pixabay
Marinade
Garlic Powder and Paprika: you can also just chop fresh garlic!
Lemon Juice or Lime Juice
Soy Sauce: regular or light soy. Dark soy is quite strong and I would not use it for this. I prefer to use it in very small quantities when making stir-fries instead.
Siracha Sauce: I love using this garlic and chilli sauce in many marinades! It adds some heat but as it cooks it definitely won’t be as spicy as it is when just used straight out of the bottle. It will just add a nice warmth to the dish. If you want it more spicy, add more! or you can also substitute this for a flat teaspoon of chilli flakes.
Chinese Cooking Wine: a staple in most chinese dishes and adds a dept of flavour to the wings. You can substitute also for sake or rice wine. I use Double Phoenix that you can find online or at most asian grocery stores or Pandaroo brand that can also be found at major supermarkets.
Honey: gives the wings some sweetness & caramelisation
Ketchup / Tomato sauce
Peanut or Vegetable Oil
How to make these Twice-Cooked Sticky Chicken Wings
Boil
In a large pot of boiling water, boil the chicken wings for just 10 minutes and take them out. Put them in a bowl and let them cool down for about an hour.
TIP: I don’t like to waste the chicken flavour in the water as that is a good base for a simple chicken stock or soup. I make it weekly especially during winter so I do both on the same day to save time. It’s so handy to have a batch of the chicken stock already made in the fridge as it’s so versatile for many dishes, like chicken or dumpling soup or to make risotto of course.
If I am planning to also make the stock as well as the chicken wings, I start off by adding some carrots, onions, garlic, peppercorns and bay leaves to the cold water in the pot and let it come to the boil slowly. Once everything has come to the boil, I add the chicken wings for just the 10 minutes for them to cook. Once the wings are out, I continue simmering the stock with the vegetables for another hour. Homemade Chicken Stock Done!
Image by Pexels from Pixabay
Marinade
Back to the wings! While the chicken wings are boiling away, make the marinade. Combine the garlic powder, paprika, lemon juice, honey, soy sauce, siracha, ketchup and oil and mix well. Once the wings have cooled down after boiling, add the marinade and stir through.
You can then place the wings in the fridge to marinade for 30 minutes to 1 hour, they won’t need longer as the marinade is quite salty. If you are making them ahead of time eg. the morning for the evening, you can keep the par-boiled wings and marinade separate in the fridge and combine them 30 minutes before cooking them.
Pan Fry or BBQ
Because they have been already parboiled they won’t need long at all on a hot pan or BBQ (see tip 3). 5 to 7 minutes tops! What you are looking for is a nice char on the skin and for them to be hot through in the inside.
The chicken wings pan frying after a few minutes in a hot pan
Tip 1: Cook the wings in batches if you are using non stick pan. The sauce will thicken and stick to the wings within a few minutes so keep turning them over till they have some char on them.
Tip 2: If you prefer them less charred but with more sauce, take them off the heat when you see that the wings have darkened slightly in colour and the sauce has thickened to the consistency that you prefer.
Tip 3: If cooking on the BBQ and to same yourself some scrubbing later, put just the wings on the BBQ but reserve the leftover marinade. Using a separate small pan, reduce the marinade till it thickens and pour it over the wings once they have been grilled on the BBQ.
Serving Suggestions
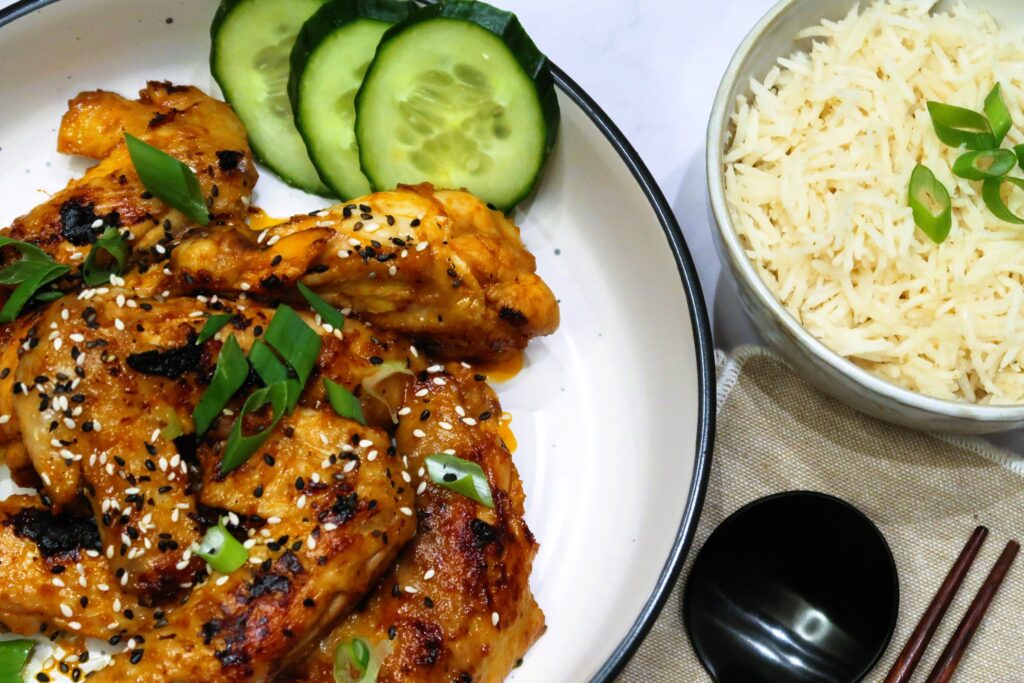
I like to serve the wings with sliced cucumbers and steamed rice but you could also have them as a starter on their own too! Enjoy!
1KgChicken Wings(if brought whole – each wing cut in half and with tip removed)
1tspGarlic Powder
1tspPaprika
Juice of Half a Lemon
2tbspSoy Sauce
2tbspSiracha Sauce
2tbspKetchup
2tbspPeanut or Vegetable Oil(and a few extra for pan frying the wings)
2tbspHoney
2tbspChinese Cooking wine
1 tspSesame seeds(for garnish)
2Spring Onions(Sliced for garnish)
Instructions
Bring a large pot of water to the boil. Once boiling, add the chicken wings and cook for 10 minutes. Take them out and put them in a bowl and let them cool down for about an hour.
Meanwhile, make the marinade. Combine the garlic powder, paprika, lemon juice, honey, soy sauce, siracha, ketchup, chinese rice wine and oil and mix well.
Once the wings have cooled down after boiling, add the marinade and stir through. You can then place the wings in the fridge to marinade for 30 minutes to 1 hour.
Add a few tablespoons of oil to a non stick pan over high heat. Once the pan is very hot, add the wings in batches and do not overcrowd the pan. They will only need 5-7 minutes maximum cooking. See more recipe notes at the bottom.
Serve on a plate and garnish them with sesame seeds and sliced spring onions. Serve as a started or with sliced cucumbers and some plain rice. Enjoy!
Notes
Storage: In the fridge for up to 3 daysNotes:Marinade: The wings do not need any longer than 30 minutes to 1 hour in the marinade, as it’s quite salty. If you are making them ahead of time eg. the morning for the evening, you can keep the par-boiled wings and marinade separate in the fridge and combine them 30 minutes before cooking them.Pan Fry or BBQ the Wings: Because they have been already parboiled they won’t need long at all on a hot pan or BBQ. 5 to 7 minutes maximum! What you are looking for is a nice char on the skin and for them to be hot through in the inside.Tip 1: Cook the wings in batches if you are using non stick pan. The sauce will thicken and stick to the wings within a few minutes so keep turning them over till they have some char on them.Tip 2: If you prefer them less charred but with more sauce, take them off the heat when you see that the wings have darkened slightly in colour and the sauce has thickened to your desired consistency.Tip 3: If cooking on the BBQ and to same yourself some scrubbing later, put just the wings on the BBQ but reserve the leftover marinade. In a small non stick pan reduce the marinade till it thickens and pour over the wings once they have been grilled.
Hot Chips & Silky Chocolate. The first and forever lasting memory I have of Belgium is this. Taking strolls in beautiful squares and along the canals in Bruges, and stumbling upon shop windows so lovingly decorated with overflowing chocolates & waffles. Restaurants and street vendors with hungry tourist and locals walking away with large cones of hot Frites draped in sauce. This is Belgium! Read on to find out more on what are the best foods that Belgium is known for.
The Most Popular Foods Belgium is known for
Belgian Fries or Frites
Belgium Frites are sooo crunchy and delicious, the best chips you will taste! You know why? They are double fried! No need to go to any fancy restaurants to eat these. The fry stands that you find everywhere in Belgium serve up these tasty chips and they will be the most delicious, crispy chips you will ever taste.
Fun fact! The term French Fries doesn’t mean the chips are from France. They are in fact from Belgium! The Americans discovered the tasty snack during World War 1 and called these (incorrectly) French Fries. This was mainly because the majority of people in Belgium speak French.
Another thing that blew my mind is the choice of sauces you can put on them. There is usually a sauce menu, a long one! There are around 20 different types to choose from and many are house-made sauces. If you want you can just stick to the classic combo of ketchup and mustard (although the locals prefer just mayo), but, if you feel like something different, try the Andalouse. It’s a tangy sauce with a hint of spice made with mayonnaise, tomato paste, pepper & lemon.
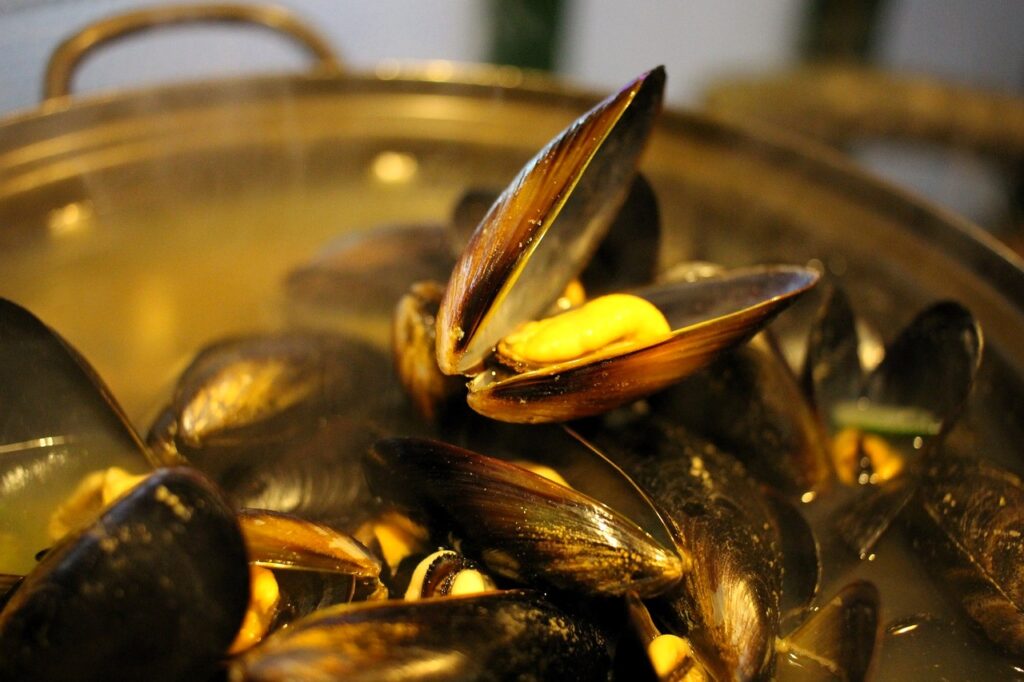
Moules-Frites
One of the most popular dishes in the whole of Belgium, is the perfect combo of steamed mussels paired with hot & crispy frites. The Moules are usually cooked in a classic French Marinière style which means simply steamed, with finely diced shallots, garlic, white wine, butter & parsley. Some recipes and restaurants also add a splash of cream, which gives them a more rich, luscious flavour.
I love mussels and this is a dish that you can easily recreate at home. Check out this recipe HERE.
Image by enow from Pixabay
Belgian Waffles
Another staple of the food scene is Belgium are waffles. Unlike in the US where waffles are generally eaten at breakfast, waffles in Belgium are more of a snack or a sweet treat. You will see food trucks that sells them everywhere on the streets of Belgium and the toppings combinations are endless, and yes, you can lather them with.. Belgian chocolate too. But, don’t be afraid of having a plain one either, they are just as good, because they are just done, well, perfectly!
In Belgium there are mainly 2 different types of waffles that you will find. The Liege waffle is made from a thicker batter with lots of granulated sugar over the top, and here in Australia this is what I generally find at the shops to buy. The Brussels waffle instead, is slightly different and has lighter, fluffier batter. The hardest decision will be just which one to have!
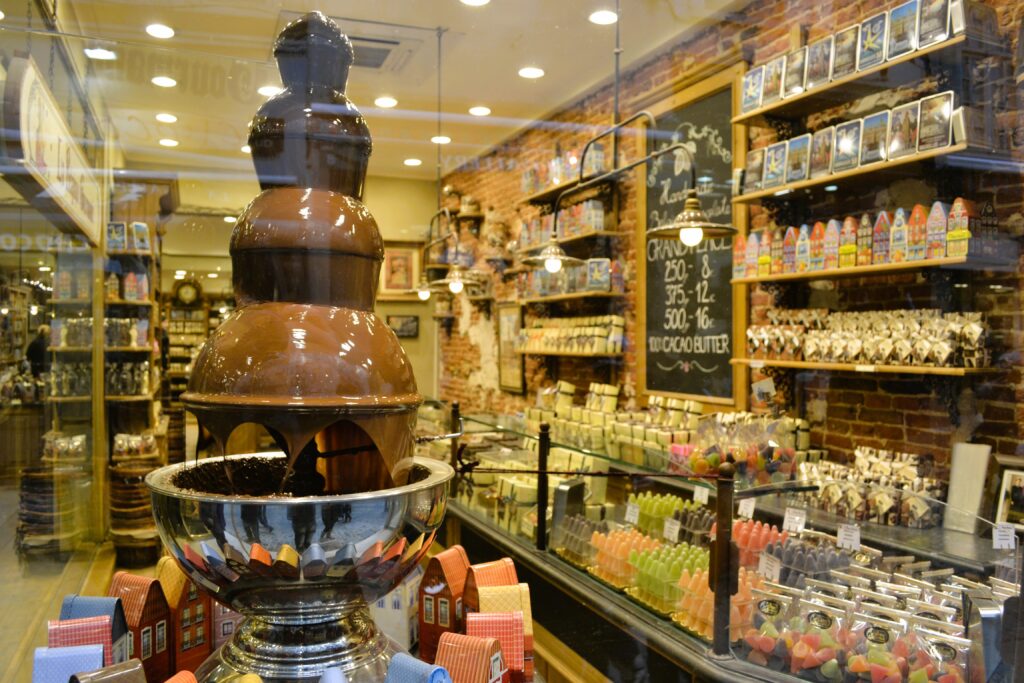
Belgian Chocolate
For any chocoholics like me out there, Belgium is chocolate HEAVEN and one of the foods that Belgium is most well known for. In smaller towns like Bruges, you will see a chocolate shop in pretty much every corner.
So what is it that makes Belgian Chocolate so special? It’s two things mainly: the ingredients and the way it’s made. The cacao components in Belgian Chocolate are grinded very, very fine. That makes the chocolate extremely smooth that it just melts in your mouth. The chocolate also has a high Cacao Butter content, usually 100% and as a result, you get a silkier, healthier chocolate, so surely it’s ok to have more then, right?
Fun fact!Traditional Chocolate Praline (which is known as a soft or liquid centre covered in a thin layer of chocolate) originated in Belgium. According to Neuhaus Chocolates, the tale is that in the 1850s a pharmacist, Jean Neuhaus, started covering medicines in a thin layer of chocolate to make the pills a bit easier to swallow. Needless to say his customers were very pleased!
Some of the most popular brands of chocolate include names like Côte D’Or & Godiva.
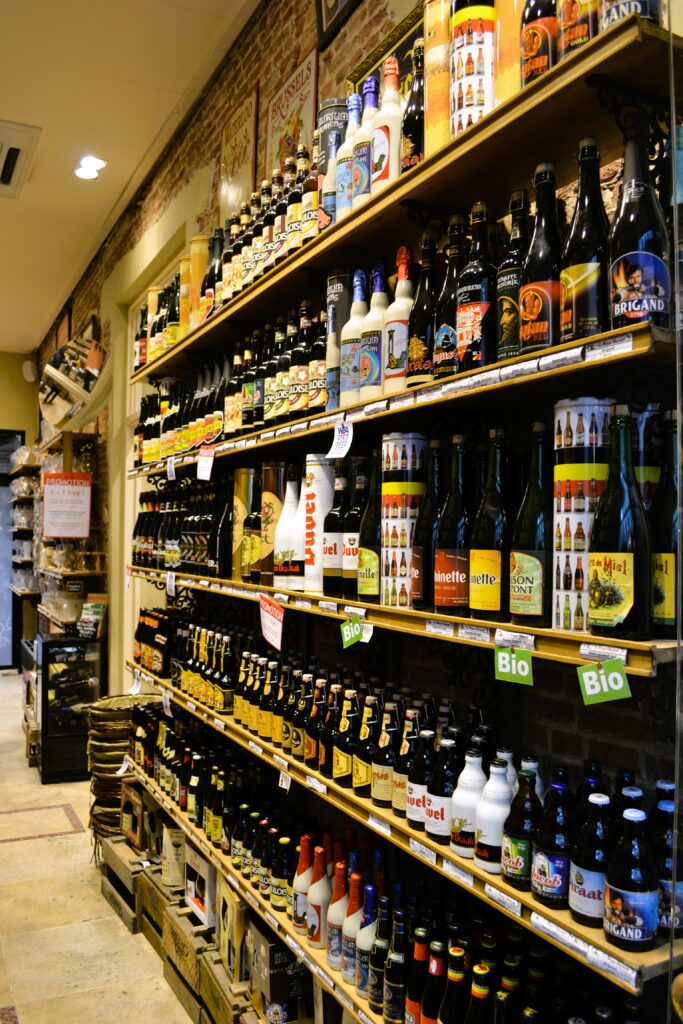
And to Drink? Belgium Beers!
It’s no secret that Belgium has some of the best beers in Europe. So if you like beers, Belgium HAS to be on your list of countries to visit. Walk in somewhere for a drink, and the beer menu will be pages and pages long. Trappist, Wheat, Abbey, Fruit beer varieties and the list goes on. Drinking beer anywhere in Belgium is serious business!
There are a lot different types of beers, some say over 1000! It’s home to over 200 breweries which is mind blowing for a relatively small country in Europe. So, It’s fair to say that Belgium leads in way in having the biggest varieties of craft beers in the world.
Even if you are not much of a beer drinker (like me), you can be pretty much guaranteed to find a beer in Belgium that will suit your taste. Don’t like strong beers? try a white beer, a bit sweet, a bit sour, with a lemony taste. Do you like fruity flavours? well there are several fruit beers. The most popular one is a cherry beer, Kriek, that is just delicious!
There are soo many other varieties. Some of the most popular beers to drink in Belgium include Tripel(a strong pale ale),Chimay(a popular Trappist beer), Delirium (look for the pink elephant on the bottle), and Hoegaarden, a white beer, which is widely sold in many countries worldwide.
Hope you enjoyed this post about What Foods is Belgium Known For!
How many times have you started looking forflights online and you just get confused and overwhelmed? There are so many flight options, prices, add-ons and the list continues. How do you get the best price? I’ve got you covered! These are my Top 5 Tips on How to Book the Cheapest Flights Online.
Use a search engine
Image by Tumisu from Pixabay
Use a website like Skyscanner to get an overall idea of cost and airlines that fly to your destination. Skyscanner will bring up all the search results from cheapest to most expensive. Look at stopover options and see if it’s worth getting a flight with additional layover time. Consider budget airlines but make sure you add up all the extras when booking!
It’s worth checking all the flights that depart from ALL your closest airports in the country you are flying from – and do the same thing in your destination. If you don’t mind adding some additional travel time, adding a train, bus or a budget connecting flight could save lots.
Adding on a low cost flight
Think of Europe for example where the countries are all fairly close. If you book early you can snap up fares on budget airlines for less than $100 AUD / $60 USD one way. If you can’t get an affordable fare to the exact city you are after, fly to another city and tag on a budget flight to where you need to go! Just make sure that you have accounted for luggage fees and the correct airports for the connections. This is so that you don’t end up having to pay costly transfers between airports.
Image by Pexels from Pixabay
Add on some land travel
The other option is also taking land travel like trains or buses to get to your destination. If you are travelling in Europe to the south of Spain to Seville for example – you might find that flights to nearby Malaga are more affordable at the time of travel. You can then reach Seville with a bus for less than 10 EUR / 10 USD in a few hours! You can read more of my Tips HERE on How to Save Money when Travelling around Europe.
Get in early
Image by Ryan McGuire from Pixabay
Book early! Especially for international flights, as a general rule at least 3+ months before flying. Leaving a flight booking very last minute hoping to get a cheap deal – is very unlikely to work out for you. You will generally pay more the closer to the departure date. Compared to booking hotels where during off season you can probably snap up a bargain last minute, it doesn’t really work like that with prices for airfares.
You also have to think that for certain destinations eg. Europe, there is still a massive backlog of people wanting to travel due to the borders being closed for so long for the COVID pandemic. That means that especially for peak season, demand is high, availability is limited and prices reflect that, by being $$$.
Image by Jose’ Soto from Pixabay
A good practice is to look well in advance and to set upairfare price alerts like this one on Skyscanner. The alerts will give you an indication on when the prices fluctuate.
If you are looking at flying specifically for a large international events eg. World Cup / Grand Prix – look and book much more in advance, potentially once the dates for the events you want to attend are released.
Be flexible with dates
Image by Károly Váltó from Pixabay
A bit of a no-brainer on How to Book the Cheapest Flights Online is to be flexible! Airlines price their seats based on supply and demand. Flights prices change multiple times a day, every single day. Across one week you can find more often than not, the exact same flight has different prices every day. So how do you find the cheapest day to fly?
How airlines price their seats
A lot of factors affect the pricing of airfares and it’s mainly driven by searches and seats sold. Economy class seats for example are classed in many more different ‘subclasses’, even though they are all economy seats. A certain amount of seats are allocated from cheapest to most expensive subclass. Once the cheapest subclass allocation is exhausted – it goes to the next subclass that cost more and so on, you get the point.
Image by Stuart Bailey from Pixabay
Check shoulder dates
If you are searching for particular day to fly – definitely check a day before or after too if you can. You might see that there is a difference with the cost!
Cheapest days of the week to fly
Flights on a Tuesday, Wednesday or Thursday are usually the cheapest to fly domestic and international.
On the search engine sites eg. like Skyscanner, when selecting your dates you can also see a heatmap showing the cheapest days to fly within your chosen month. That is extremely helpful to pick the cheapest dates if you are flexible.
Book only from reputable sources
When you are looking at fares and are ready to book, have a good look at the booking sites and make sure it’s a reputable source.
If you are packaging the flights with accommodation sites likeExpediaand getting a great deal with your points for example, you are dealing with a well known global company. But, if you are looking at a site that may be a few hundred dollars cheaper and you have never heard of them, I would hold off handing over the credit card. There could be hidden fees that only appear once you are at the checkout page that might take you by surprise and, who do you contact if you need support or if something goes wrong?
Image by Tobias Rehbein from Pixabay
Benefits of booking directly with the airline
There might be a number of specific reasons that you are choosing to book with other companies rather than the airline directly and that is very much down to the individual. If you are choosing to book directly with the airline, these are some of the benefits:
If you have an issue with your ticket or need to amend something, you can contact the airline directly and they can solve the issue for you immediately.
If you have booked through a third party (that includes online travel sites), generally any amendments will need to be done via the third party. If you call the airline, they will not be able to help you as the reservation is held by someone else. They could be hard to get a hold of and you might be stuck waiting for a while for a change to be made. They also may need to go back to the airline to get approval for changes.
The fare rules should be displayed clearly by the airline for the airfare you are booking. If you have to cancel and get a refund for example – the airline would generally have a set fee. The third party may have additional fees that they take. Again it might take a while for any refunds to be processed when there is a third party involved.
Image by Steve Buissinne from Pixabay
To sum it up
Hope you found the above Tips useful on How to Book the Cheapest Flights Online! To sum it up:
Do your research and use a search engine to compare airlines and travel times
Check different airports to see if the prices are better
Book early
Be flexible with your travel dates
Book from reputable sources – you will be thankful if something goes wrong!
Ready to book? Jump on SkyScanner HERE and start researching your next holiday!
Want to grab yourself a good deal on a flight and are looking on a search engine like Skyscanner? There is a lot more to it than just the price you see when you are seeing a cheap airfare advertised. This is what you need to know to make sure you are really getting a good deal on Skyscanner.
Why use a search engine to search for flights
Using a search engine like Skyscanner is a great way to get an overall idea of cost and to see what airlines fly to your destination. In my article on How to Book the Cheapest Flights Onlinethere are also a few more tips you can read on the topic. With Skyscanner you can search for‘whole month’in the depart and return fields, to get an overview on what are the cheapest dates to fly. If you have some flexibility with dates, this is a super handy tool rather than having to look at individually day by day at fares. It will also save you loads of time instead of looking at each date on different airlines websites!
Skyscanner generally will surface all the search results from cheapest to most expensive airlines. Note that no different to any other search engine – some airlines might be paying for that top placement on the list. So even if they are not the cheapest, ensure to adjust your filters for the price or keep scrolling till you have a look at all the available options.
Adjusting Filters: Stopovers or Direct Flights. Are you really getting a good deal on Skyscanner?
On Skyscanner, an important step is to adjust your filters to the left. These are mainly around the stops (if you want to fly direct or with a stopover) and the trip duration. Have a think about your trip and how many hours you want to fly to get there.
Image by Rudy and Peter Skitterians from Pixabay
Consider this – you might save some money if you do a layover and it takes an extra few hours – but, it may also mean that extra hours at the airport = more purchases, like meals, airport lounge and, lets not kid ourselves.. shopping. Getting to your destination later, might also mean you miss a day at your destination and you end up paying for a night in a hotel that you only use for a handful of hours which would be a waste. Add all those things up and work out if it’s worth it based on your budget.
Image by Stela Di from Pixabay
Calculating total costs: Airlines Add-Ons
In the search engines, budget airlines will usually appear at the top of the searches as the cheapest but consider that there may be some additional expenses that are generally not part of their basic fare that is displayed. Some of the most common add ons on are:
Meals and drinks
Luggage
Entertainment including wi-fi access
Seat allocation fees
Processing fees to pay with a particular credit card type
Flexibility and higher fees for changing dates / refunds
Airport Check-in fees
Note also that in recent years many full service airlines are also now adopting this model of offering a lower cost basic fare – but many inclusions like seat allocations that you might think are included are now a add on.
Image by Dirk Daniel Mann from Pixabay
Downsides of using a search engine to compare fares
There are two downsides to comparing flight prices with a search engine:
You cannot see the final price with all the extras: The search engines will usually only display the airfare cost – but again, what airlines include as part of their ticket offering differs greatly. The only way to see the absolute final price you will pay – is by going in the site you choose and pretending you are making the booking right up till the final booking screen (before clicking Pay of course) which will display the final price with all the extras and processing fees.
Image by Louis from Pixabay
It cannot work out fares or makes it difficult to compare when it’s a complex itinerary: Search engines start to get a bit more complicated to use if the itinerary is a complex one that involves multiple stops. Once you also start going across more than 2 continents, the ticket is technically a Round The World ticket. For these you are probably better off going on a Round The World site like One Worldto check fares.
Image by Alexas Fotos from Pixabay
If it all gets too confusing – it is also worth going to a local travel agent to check how you can get to your destinations. They will know what will be the best way to organize and break down your itinerary and give you an idea of price, so you will then have a better starting point to do your research.
Which are the best flight search engines
Aside fromSkyscanner, which is my favourite search engine when looking for flights, there are also some other great ones that you can check out!
A tasty and complete meal, this Sausage and Ricotta Baked Pasta is everything I love on busy weeknights and is the perfect make ahead dinner. Made with a tomato based sauce, lots of melted mozzarella & dotted with fresh ricotta, this will be your new favourite pasta bake.
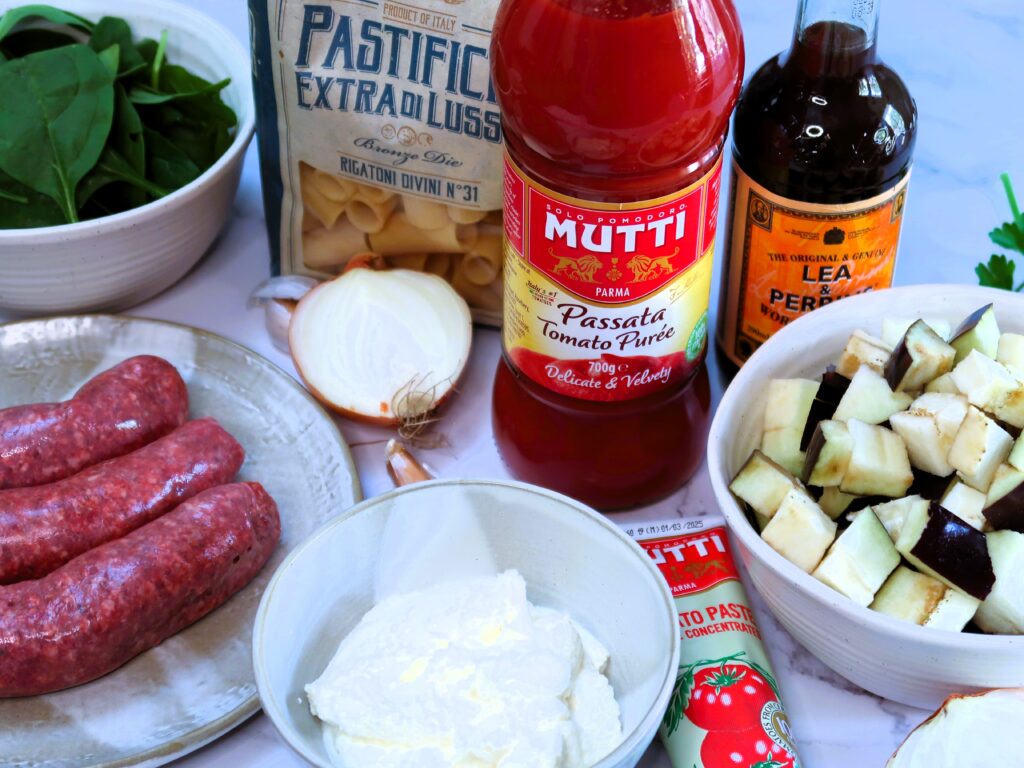
Ingredients for this Sausage and Ricotta Baked Pasta
Pasta: My go-to for this recipe is Rigatoni! I really love using this pasta shape as it holds onto the sauce and the cheese well when baked. My favourite brands that I use all the time are Molisana and Barilla. Penne, Paccheri or Ziti will also work well as pasta types for this one. Make sure that when cooking the pasta you cook it till al dente only, just with a slight bite to it. It’s super important! The pasta will have some further cooking in the oven with the sauce so no overcooking is a must.
Eggplant & Baby Spinach: I love adding some vegetables to baked pasta dishes to add some lightness to it. You can add any other vegetables you like, peppers and zucchini would go great in this too.
Pork Sausages: The best you can find at your local butcher or supermarket! I like using pork and fennel or italian style sausages with lots of pepper and sometimes chilli. Chicken or beef sausages or even chorizo are great substitutes too. I don’t usually take the casings off before slicing and cooking but if you prefer you can.
Onion & Garlic: the base of the red sauce when making the soffritto
Passata & Tomato Paste: my absolutely favourite brand is MUTTI! Passata will make a thicker sauce vs using tinned tomatoes, which you would generally need to cook for a bit longer.
Worcestershire Sauce: an essential ingredient in most of the sauces I make. It adds a tang and savoury flavour to the sauces. When cooked through for a little while it adds another layer or dept to any red or meat sauce.
Extra Virgin Olive Oil, Salt & Pepper: Season season season! for the veggies & the sauce.
Shredded Mozzarella: Lots of it for layering through the pasta and at the top to become deliciously melty!
Fresh Ricotta: If I can get some fresh one from the deli, that would be my go to! But a small tub of normal or smooth ricotta works perfectly well too. It adds a beautiful creaminess to the dish and bakes like a dream!
Fresh basil, to garnish
How to make Sausage and Ricotta Baked Pasta
Cooking the eggplant, sausages & spinach
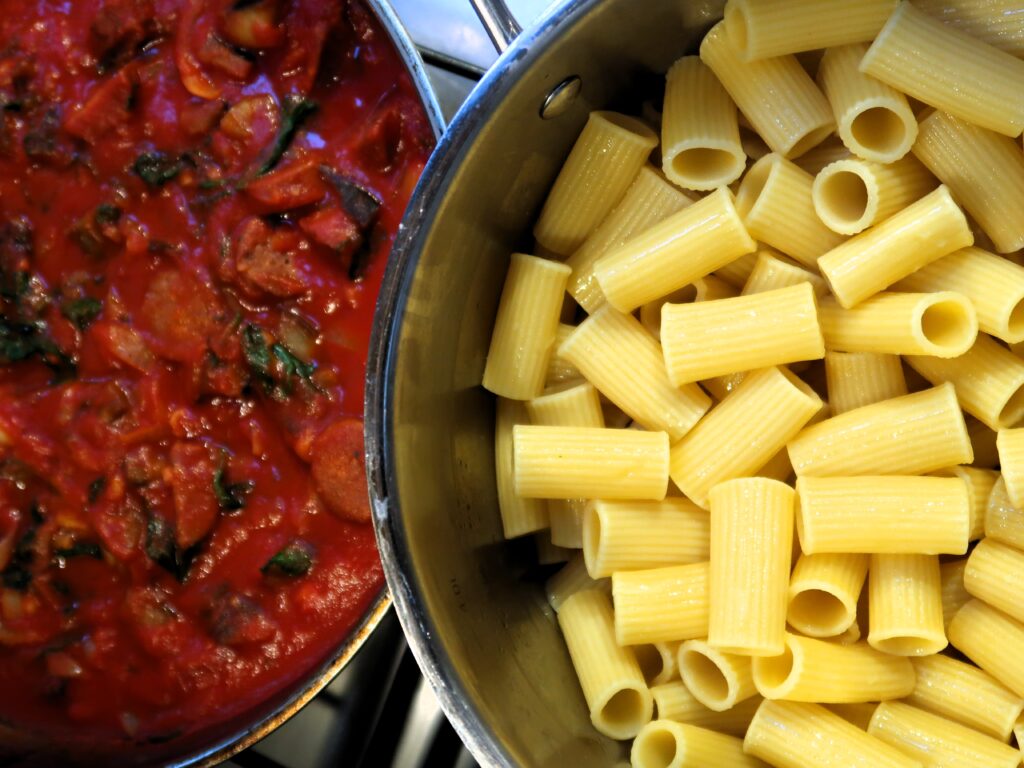
First step is to cook the eggplant, sausages & spinach. With a few generous tablespoons of olive oil, season and cook down the eggplant till it softens and gets a bit of a char. Add the sliced sausages and also cook them down. Lastly, add and wilt the spinach in the same pan with the eggplant and sausages.
All the flavours will have a chance to mingle and the fat from the sausages will add more taste to the vegetables. Put then all these aside in a bowl. You can use the same pan for the next step, so no need to wash unless there are any burned bits and you can move onto the sauce.
Tip: To save time – you can also use a separate non-stick pan and cook off the sausages, eggplant & spinach at the same time as you make the sauce in another pot.
Tomato Sugo or Sauce
Next step the sauce. To me an absolute must in making a tasty red sauce for any pasta is TIME! Unless you are using very fresh and sweet, fully ripened tomatoes where you can make a quick fresh sauce in a short amount of time, anytime I use tinned tomatoes, passata or tomato paste, these NEED to be cooked off first. This is to take off the raw / sour taste off the tomatoes and give it a much more mellow, complex flavour.
First we start off with making the soffritto, which is very gently frying off onion and garlic for 5-10 minutes. Then we add the passata, water (to rinse out the passata jar), tomato paste, Worcestershire sauce and salt. I then simmer the tomato sauce for at least 15-20 minutes. Once the sauce is cooked, add the sausages, eggplant and spinach back in. In the meantime you can also have the rigatoni boiling away in a large pot of generously salted boiling water.
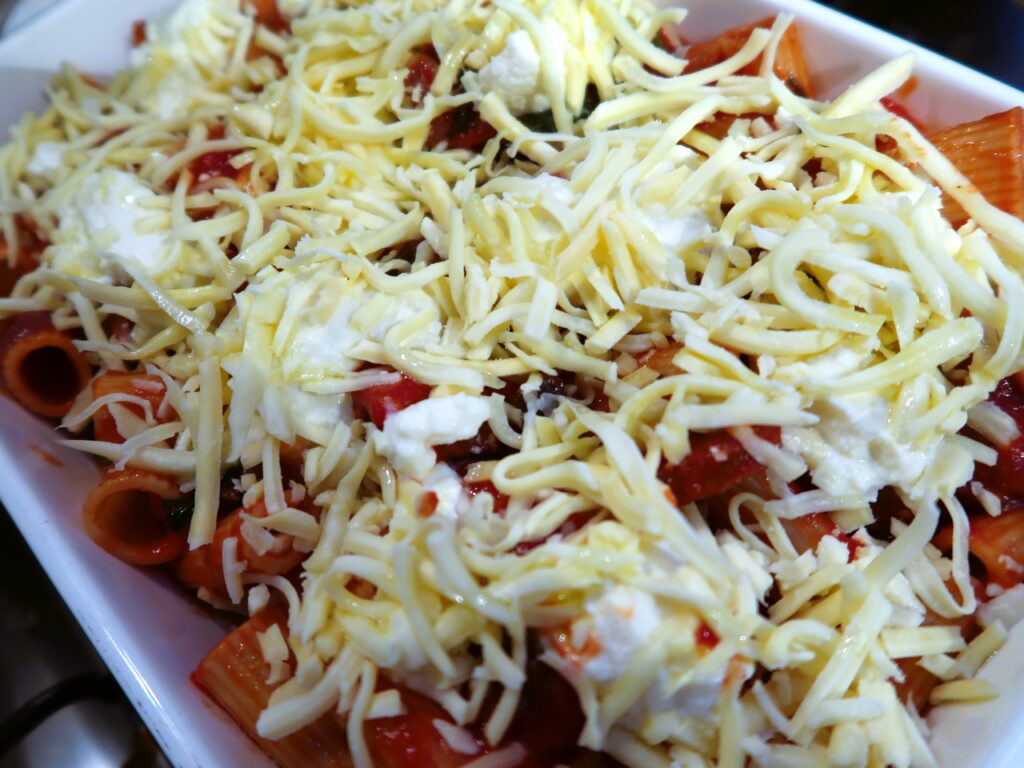
Mix together, Layer and Top with lots of cheese!
Once the pasta is cooked just till al dente and strained, put it back in the large pot with some olive oil. Add half of the sauce to it and mix through gently and let everything cool down slightly. This is so the mozzarella doesn’t melt completely as soon as you top your pasta.
Get a large baking dish and layer a third of the pasta and dot with some of the fresh ricotta, a large handful of shredded mozzarella and a bit more of the sauce. Repeat two more times ensuring the top layer has quite a bit of mozzarella. Layering it like a lasagna will ensure the pasta bake won’t be dry (it will be saucy, just the way I like pasta!) and will have some melty goodness the whole way through, not just at the top!
If your preference is to have less sauce on the pasta bake – you can also just freeze some of the sauce and save it for another day!
Bake & Enjoy!
Once all the layers and toppings are done, add a slug of olive oil and bake uncovered in a preheated oven at 200 C (180 C for Fan Forced oven) / 390 F for 20-25 minutes, till the top just starts to brown. Once it’s cooked, let everything rest out of the oven for 5 minutes before serving. This is so the pasta can hold the sauce and cheese a bit better when serving.
Planning to make it ahead of time? Some handy tips when making this Sausage and Ricotta Baked Pasta
This Sausage and Ricotta Baked Pasta dish is a perfect make ahead meal. Everything aside from the baking can be made ahead! So all you have to do is pop in the oven when you are ready to eat!
Tip 1: If the pasta bake has been in the fridge before baking – it will need longer baking time. Bake covered for 20 minutes at 180 C / 350 F to warm the centre and for another 20 minutes uncovered to brown at 180 C / 350 F.
Tip 2: If you want to freeze the pasta bake, cook the sauce, eggplant, spinach and eggplant and pasta and let the ingredients cool down before mixing them together. Arrange in a freezer safe dish and top with all the cheeses and tightly wrap it with cling film and / or lid. It will keep for up to 3 months! Once you are ready to eat it, defrost overnight in the fridge completely and bake as per above.
Hope you enjoy this one that is a favourite in my house!
Preheat oven to 200 C (180 C for Fan Forced) / 390 F.
Chop the eggplant and slice the sausages. Heat in a large pan a few generous tablespoons of olive oil, season the eggplant with some salt and cook it till it softens and gets a bit of a char for about 10 minutes.
Add the sliced sausages, cook them down for a few minutes and lastly, add and wilt the spinach for a minute in the same pan with the eggplant and sausages. Take off the heat and set aside in a bowl.
Using the same pan (clean off any burned bits), add a few tablespoons of olive oil over low-medium heat. Very gently fry off the onion and garlic for 5-10 minutes mixing constantly.
Add the passata, water (to rinse out the passata jar), tomato paste, Worcestershire sauce and salt. Simmer the tomato sauce for at least 15-20 minutes. In the meantime cook the rigatoni till al dente in a large pot of salted boiling water.
Once the red sauce is cooked, turn off the heat and add the sausages, eggplant and spinach back in the pan with the sauce, mix through and let cool slightly.
Strain the pasta and put in back in the large pot with a few tablespoons of olive oil. Add half of the sauce in with the pasta and mix through.
Get a large baking dish and layer a third of the pasta and dot with some tablespoons of the fresh ricotta, a large handful of shredded mozzarella and a bit more of the sauce. Repeat two more times ensuring the top layer has quite a bit of mozzarella.
Once all the layers and toppings are done, add a slug of olive oil and bake uncovered in a preheated oven at 200 C / 390 F for 20-25 minutes, till the top just starts to brown. Once it's cooked, take it out of the oven and let everything rest for 5 or so minutes before serving. Add some fresh basil leaves for garnish if desired and serve.
Notes
Baking: appliances vary so the timings of baking the pasta might be slightly vary.Storage: If fully cooked and baked, the baked rigatoni will last in the fridge in a sealed container for up to 3 daysMake ahead: Everything aside from the baking can be made ahead, so you just have to pop in the oven when you are ready to eat!Tip 1: If the pasta bake has been in the fridge before baking – it will need longer baking time. Bake covered for 20 minutes at 180 C / 350 F to warm the centre and for another 20 minutes at 180 C / 350 F uncovered to brown.Tip 2: If you want to freeze the pasta bake, cook the sauce, eggplant, spinach and eggplant and pasta and let the ingredients cool down before mixing them together. Arrange in a freezer safe dish and top with all the cheeses and tightly wrap it with cling film and / or lid. It will keep for up to 3 months! Once you are ready to eat it, defrost overnight in the fridge completely and bake as per above.
Course: Main Course
Cuisine: Italian
Keyword: baked pasta, baked rigatoni, easy dinner, family favourite meal, make ahead meal, midweek meal, pasta, Pasta bake, pasta dish
Did you say Coffee and Chocolate? These Espresso Bliss Balls are the perfect pick me up snack! Anytime of the day, rushing to and from, after lunch, or when the 3pm slump hits you.. and you need something.. QUICK! Just make a batch of these for and they are ready to eat anytime you want a healthy, energy packed treat!
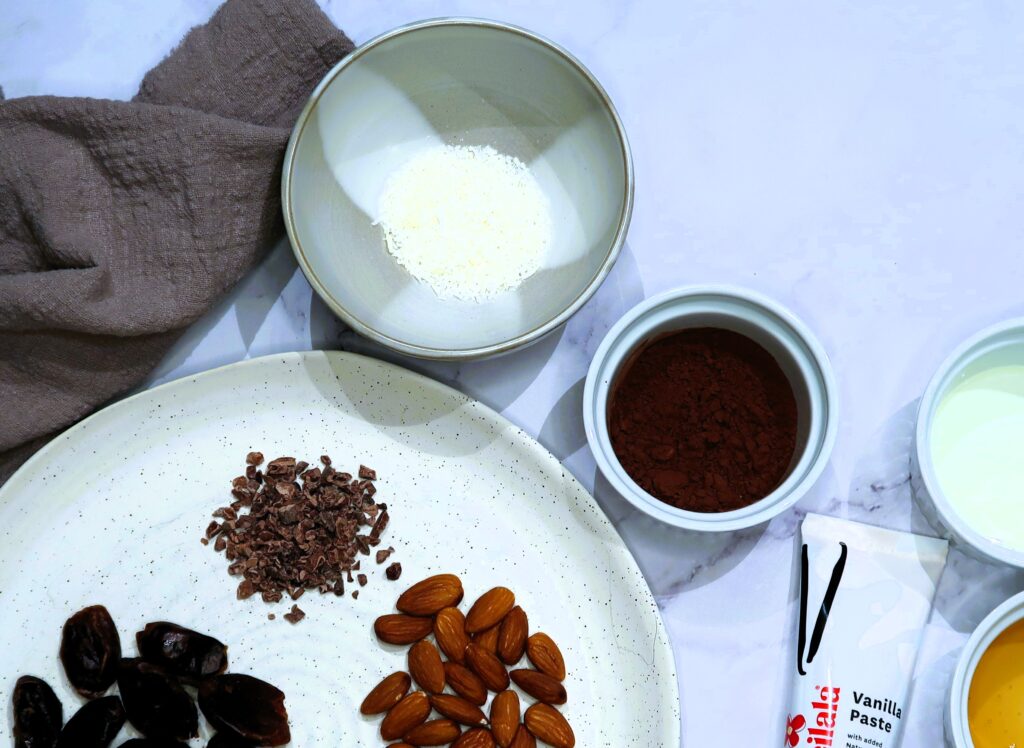
Ingredients for the Espresso Bliss Balls
Dates: I just use standard dates that you can find in any supermarket. They add sweetness to the bliss balls as well as a subtle caramel flavour. Dates are good for you too! High in antioxidants and in fibre.
Almonds: For nut free – you can also replace the almonds with standard rolled oats
Desiccated coconut: For filling and for coating afterwards too
Cacao Powder: I love cacao powder and use so much of it in baking, snacks & smoothies. It adds the strong chocolate flavour to the Espresso bliss balls.
Dark Chocolate: I like to use a dark chocolate with a least 70% cocoa like a Lindt Excellence 70%, if you prefer a more bitter chocolate option you can also swap this for a 80% or 95% cacao chocolate or a few tablespoons of cacao nibs – or if you like more sweet, just regular milk chocolate or chocolate chips.
Espresso Powder: The star ingredient and what gives these bliss balls a real kick. I use ground coffee powder. I always have Lavazza Crema e Gusto on hand at home and I find it’s perfect to give the bliss balls a strong coffee flavour (you can find it on Amazon too). You can also swap this for a decaf ground coffee if you prefer less caffeine.
Maple Syrup & Honey: I like to use both to get the caramel & sweet flavour profiles of the two
Vanilla Essence
Coconut Oil: this is what will help form and set the Espresso Bliss balls once they are in the fridge.
Image by Susanne Jutzeler, Schweiz from Pixabay
Making the Espresso Bliss Balls
These Espresso Bliss Balls can be made in 4 easy steps:
Combine dry ingredients
In a food processor, add the dates, almonds, coconut, cacao powder and espresso powder and process until it becomes a fine crumb – around 30 seconds on high speed.
Add wet ingredients and chocolate
Add the melted coconut oil, maple syrup, honey, vanilla essence and dark chocolate pieces to the food processed and process again on high speed for 5-10 seconds until well combined.
Roll
Roll the mixture with your hands into small balls (you should be able to make around 20-22 coin sized balls) and roll them in some desiccated coconut mixed with cacao powder, if desired.
Rest in the fridge
Rest in the fridge for at least 1 hour to firm up in a sealed container before serving.
A delicious snack that combines coffee, chocolate & almonds
Equipment
1 Food processor
Ingredients
1cupPitted Dates
1 cupAlmonds
1/2cupDesiccated coconut(+ 2 tbsp for coating at the end)
5tbspCacao Powder(+ 1 tsp for coating at the end)
4 tspEspresso powder / Ground coffee
40 grDark Chocolate
2 tbspCoconut oil(Melted)
1 tspVanilla essence
3 tbspMaple syrup
1tbspHoney
Instructions
In a food processor, add the dates, almonds, coconut, cacao powder and espresso powder and process until it becomes a fine crumb – around 30 seconds on high speed.
Add the melted coconut oil, maple syrup, honey, vanilla essence and dark chocolate pieces to the food processed and process again on high speed for 5-10 seconds until well combined.
Roll the mixture with your hands into small balls (you should be able to make around 20-22 coin sized balls) and roll them in some desiccated coconut mixed with cacao powder, if desired.
Rest in the fridge for at least 1 hour to firm up in a sealed container before serving.
Notes
Storage: Store in the fridge in a sealed container for up to 1 weekCalorie content: 1 Bliss Ball, 85 cal approximate